Game Bar (24H2)
- Paul Thurrott
- Dec 03, 2024
-
0
The Windows 11 Game Bar helps you manage your PC game experiences using a personalized on-screen overlay that appears over the games you play. Game Bar provides interfaces for capturing screenshots and video clips, interacting with your friends on Xbox Live, viewing key PC performance metrics, and more.
Where did it go?
Game Bar was previously called Xbox Game Bar, but Microsoft renamed it to indicate that it’s not limited to Xbox games, but works similarly with PC games acquired elsewhere, like Epic Games and Steam.
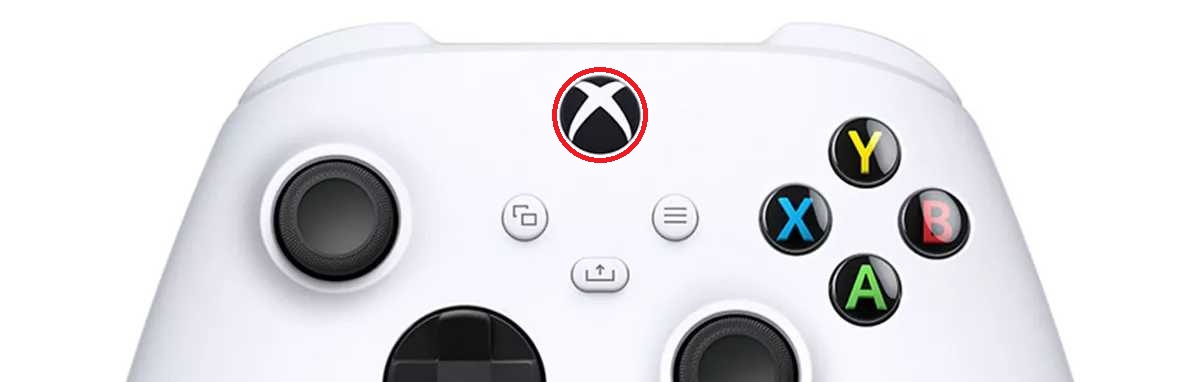
You summon the Game Bar by pressing the white and lighted Xbox button in the center of your Xbox Wireless Controller while you are playing a game.

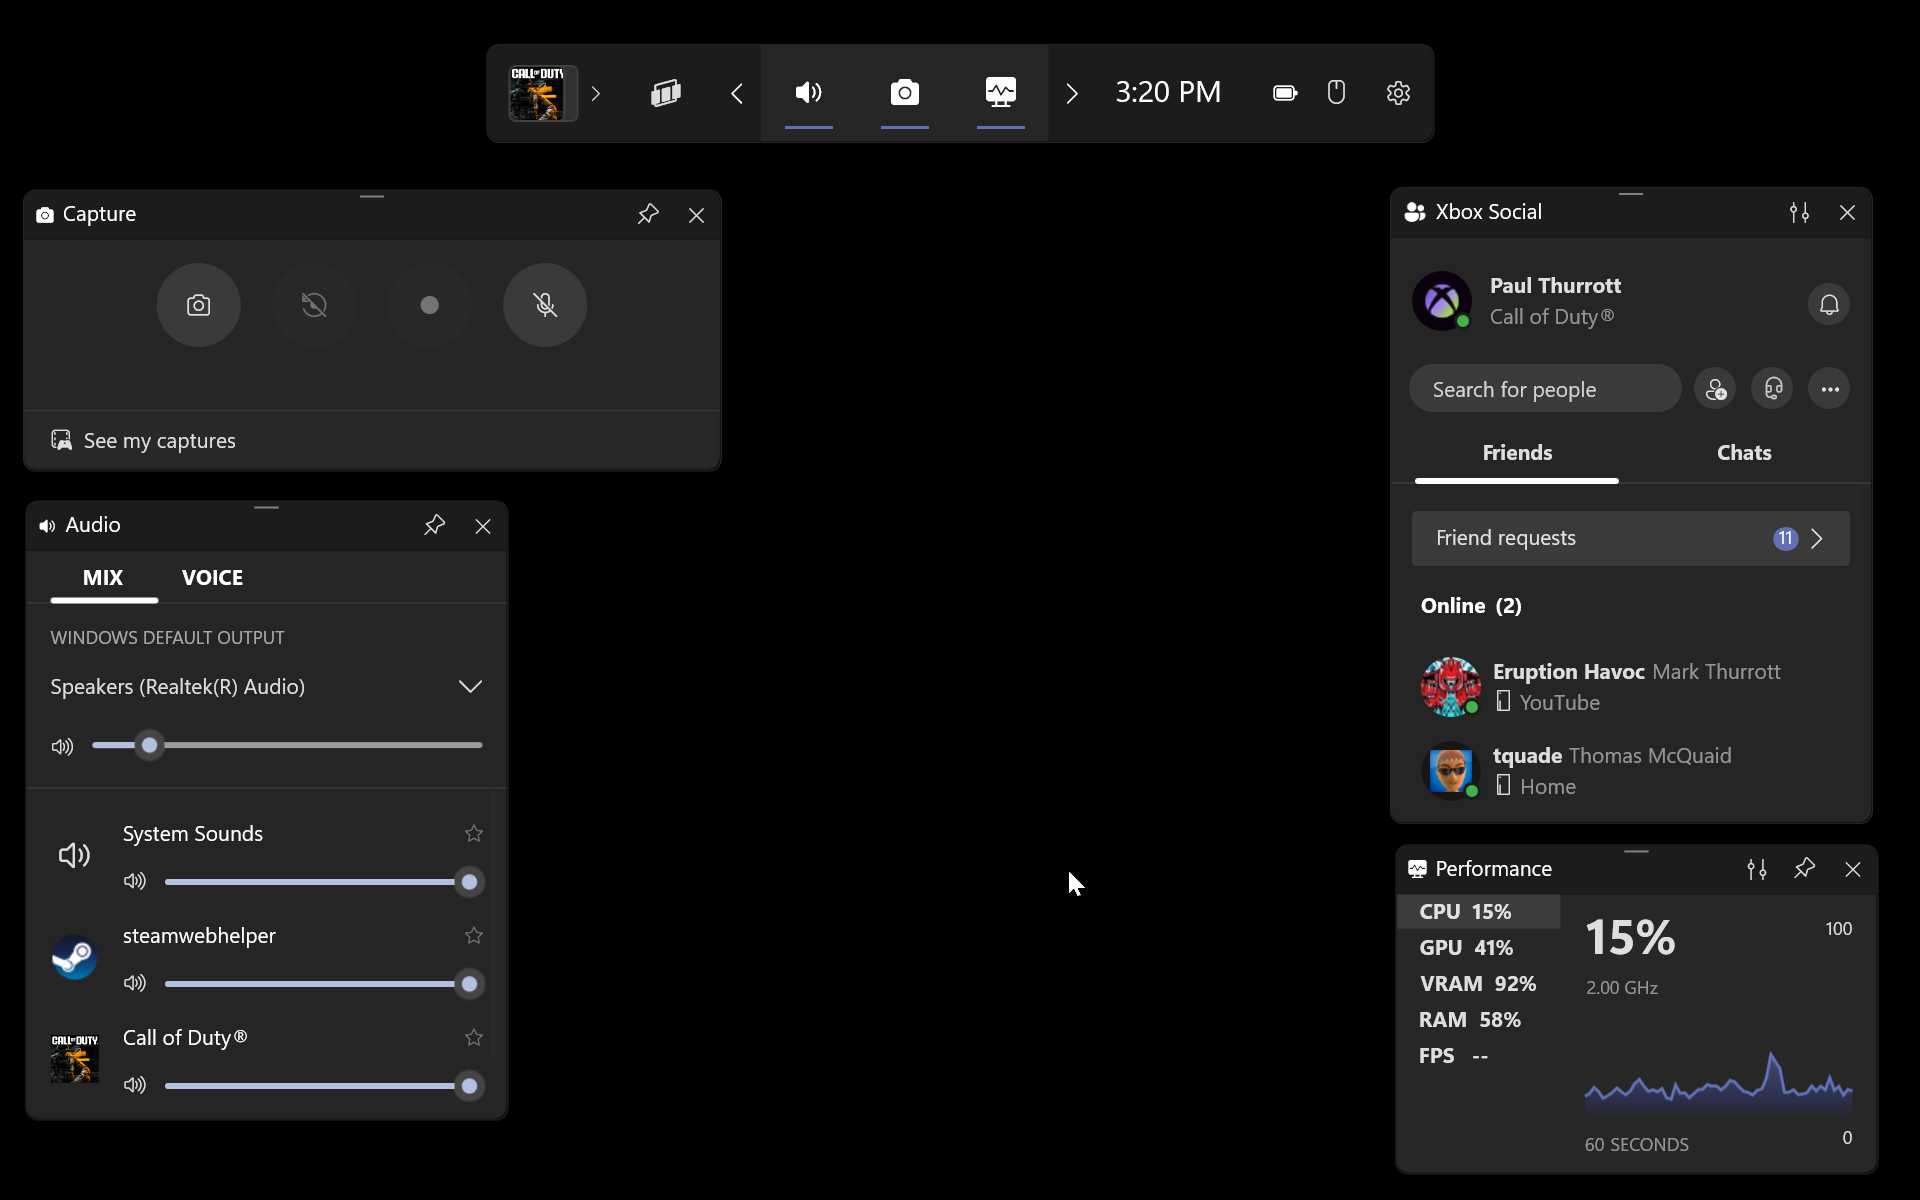
Game Bar consists of the Home Bar–a toolbar-like main window, centered at the top of the screen–and several sub-windows, called widgets, each of which offers specific functionality.

Game Bar appears over whatever game you’re playing at the time, and it works like a toggle: You can press the Xbox button–or the “(B)” button–on your controller again to hide it.
If you game using a keyboard and mouse, you can type WINKEY + G to toggle the Game Bar on and off instead. You can also click with the mouse outside of the Game Bar windows to hide it.
Get to know the Home Bar
The Home Bar in Game Bar is essentially a floating toolbar that offers several buttons and a few non-interactive icons in a single horizontal line.

These include:
Controller Bar/Home Bar. This button toggles Game Bar between its normal display mode and a more minimal view called Controller Bar that’s easier to navigate using an Xbox Wireless Controller.
We look at the Controller Bar view later in the chapter.
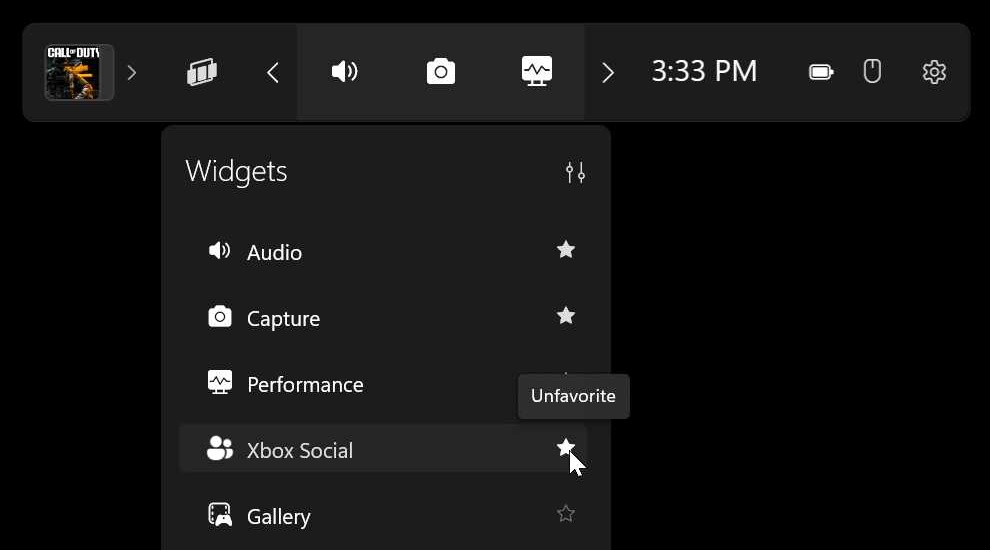
Widget Menu. Click this button to display the list of widgets you can display in and alongside the Game Bar, along with a link to the Widget Store, where you can find additional widgets. Use the Favorite/Unfavorite (star) icon next to a widget to toggle the display of that widget sub-window on or off.
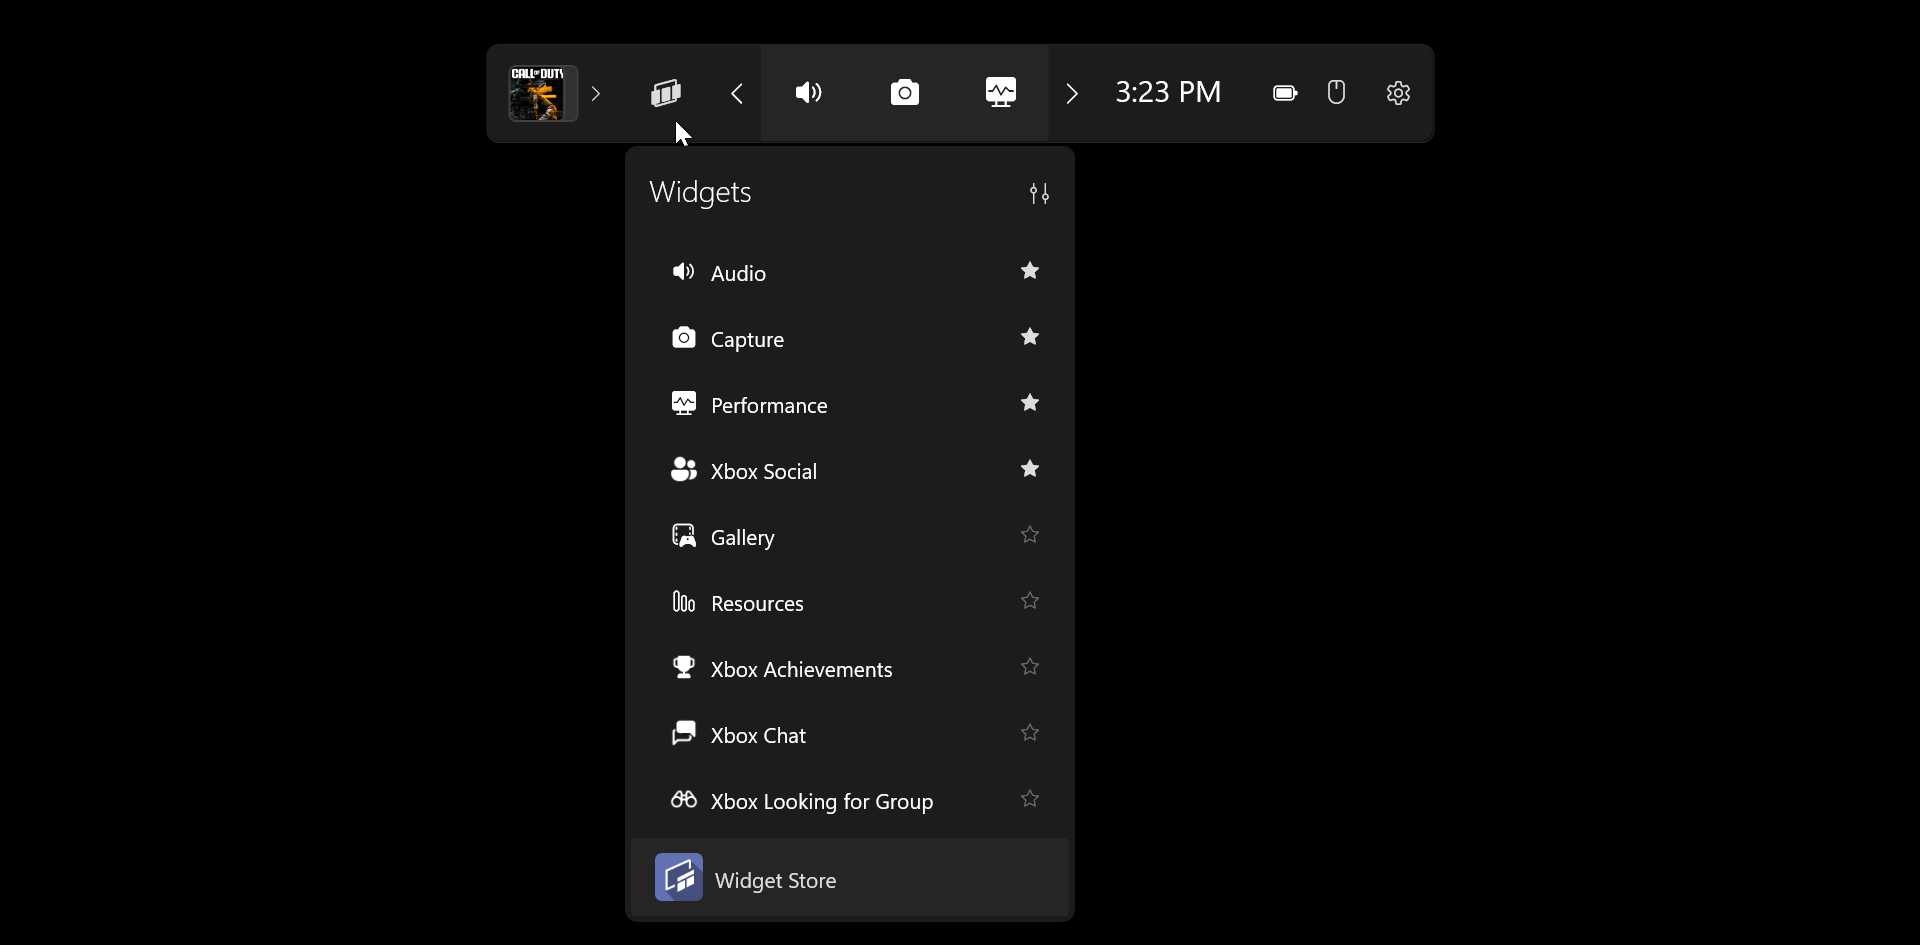
Each of the built-in widgets is described briefly in the next section.
Widgets. The center of the Game Bar displays a Taskbar-like collection of icons representing your favorite widgets–a configurable selection of widgets you want to see each time the Game Bar appears–an any other open widgets.
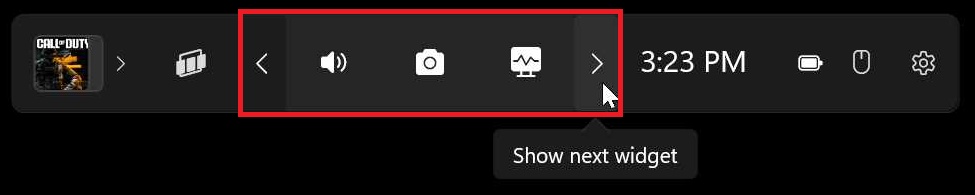
Clock. Because many PC games are played full-screen, it’s likely that the clock in the Windows 11 Taskbar will be hidden during game play. So this non-interactive icon provides a quick way to check the time in-game.
Battery status. As with the Clock icon, Battery status appears so you can see whether your laptop is plugged into power and charging, and, if not, what the remaining battery life is.
Enable/disable click-through. This interactive button toggles click-through, an esoteric feature that determines how mouse button clicks work when the Game Bar is displayed. This feature is implemented on a per-widget basis and only makes sense to enable for certain types of games, like strategy titles with many on-screen controls. For this reason, it’s disabled by default, meaning that mouse clicks do not pass through compatible widgets to the underlying game. When enabled, mouse clicks will pass through to the game without closing Game Bar.
Settings. This button, which resembles a gear, displays Game Bar setting when clicked.
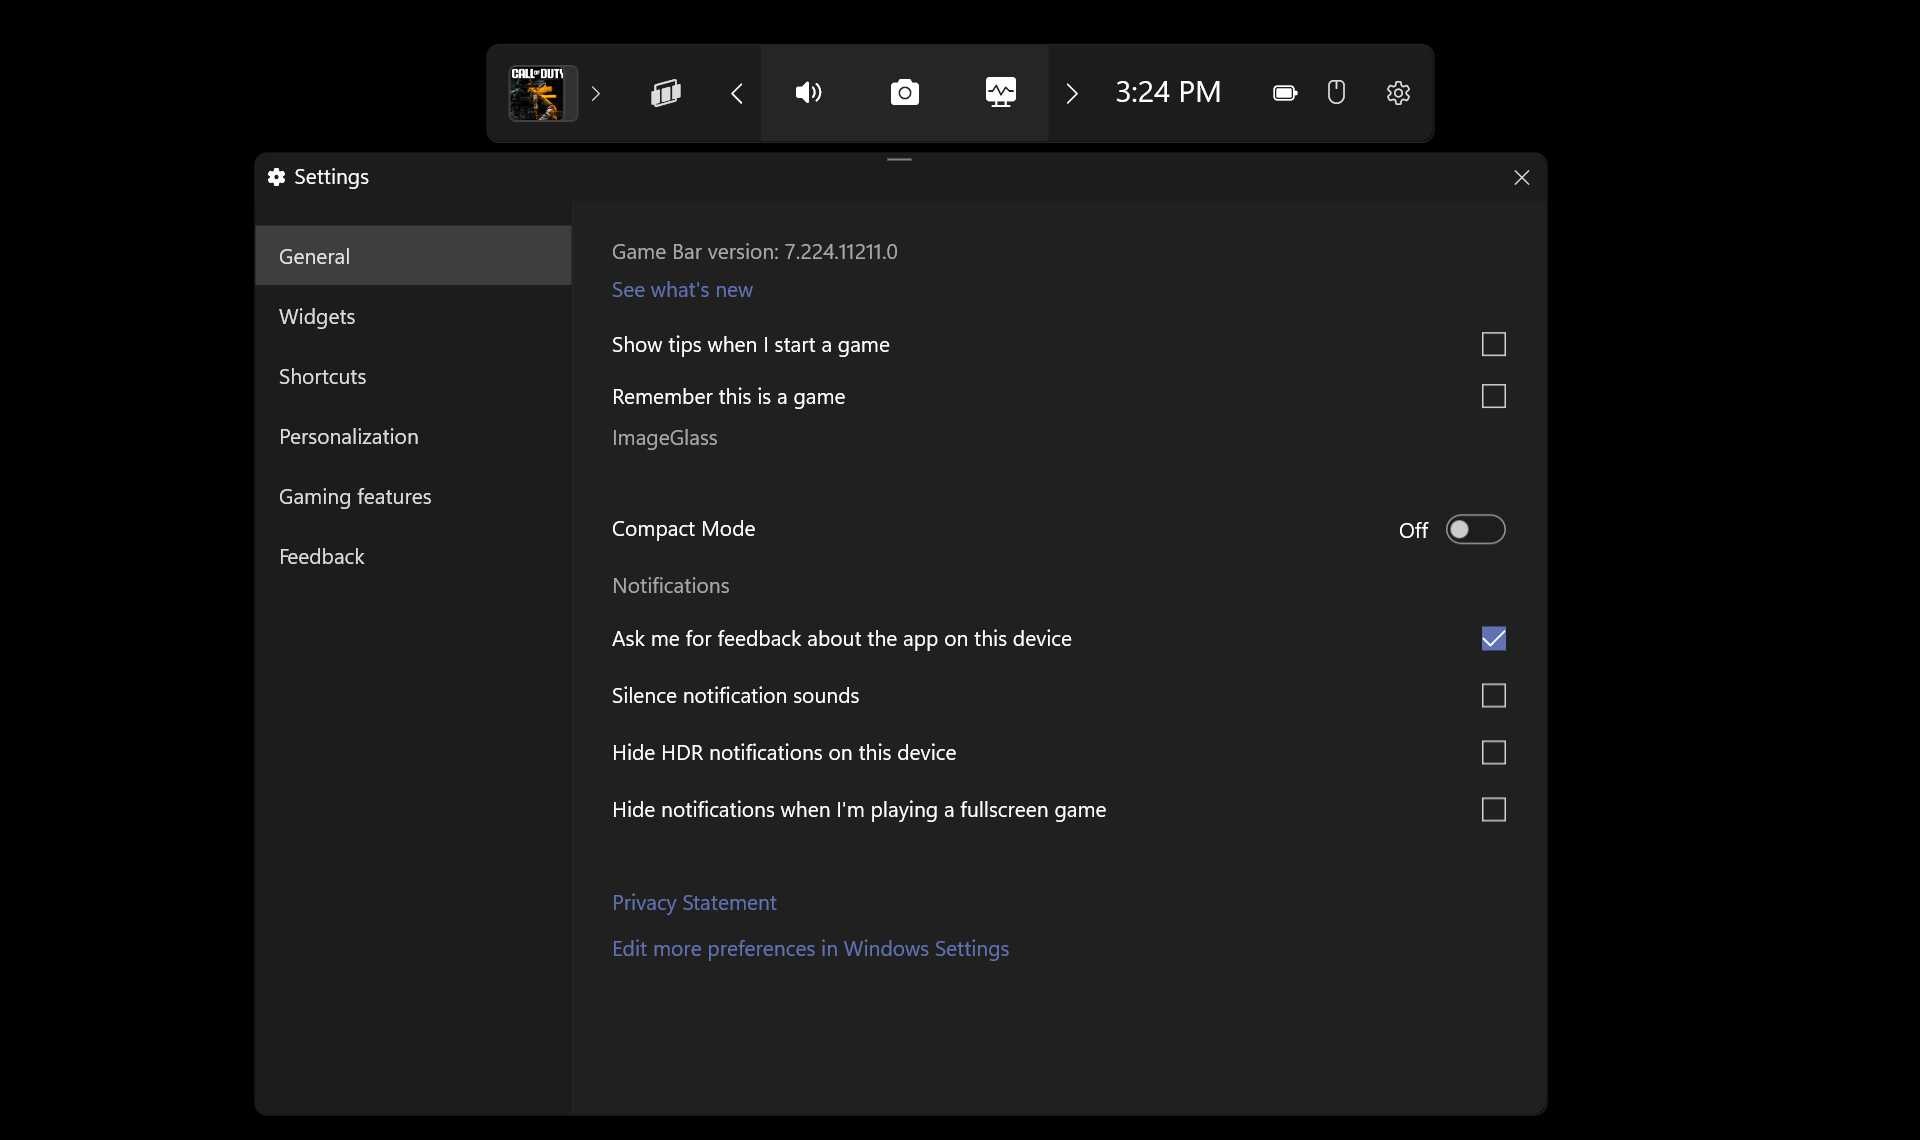
If you’re going to use Game Bar at all, you should take a few minutes and configure it to your preferences. Most of this configuration occurs in Game Bar settings, but there is a single Game Bar option in the Windows 11 Settings app you should know about: If you navigate to Gaming > Game Bar, you will find a single option that allows you to toggle Game Bar on/off using the Xbox button on your Xbox Wireless Controller. If this isn’t enabled, you can’t do so.
Configure Game Bar widgets
Widgets are central to the Game Bar experience. You can configure which widgets–your favorites–appear on-screen and where. And you can optionally pin widgets so that they always appear on-screen–over games–even when Game Bar is not displayed.
Understand which widgets are available
The following widgets are included with the Game Bar:
Audio. This overlay lets you configure the devices Windows uses for audio input–typically a microphone–and output, which is typically speakers or headphones. These capabilities may seem superfluous since you configure these devices globally in Windows. But the Audio widget can be handy if you want to use a different device while gaming. And it also lets configure the volume level for that device globally or per app/game.
Yes, you can also access some of this functionality from the Volume icon in the taskbar’s notification area. But that icon will be hidden if you’re playing a game full-screen, as is often the case.
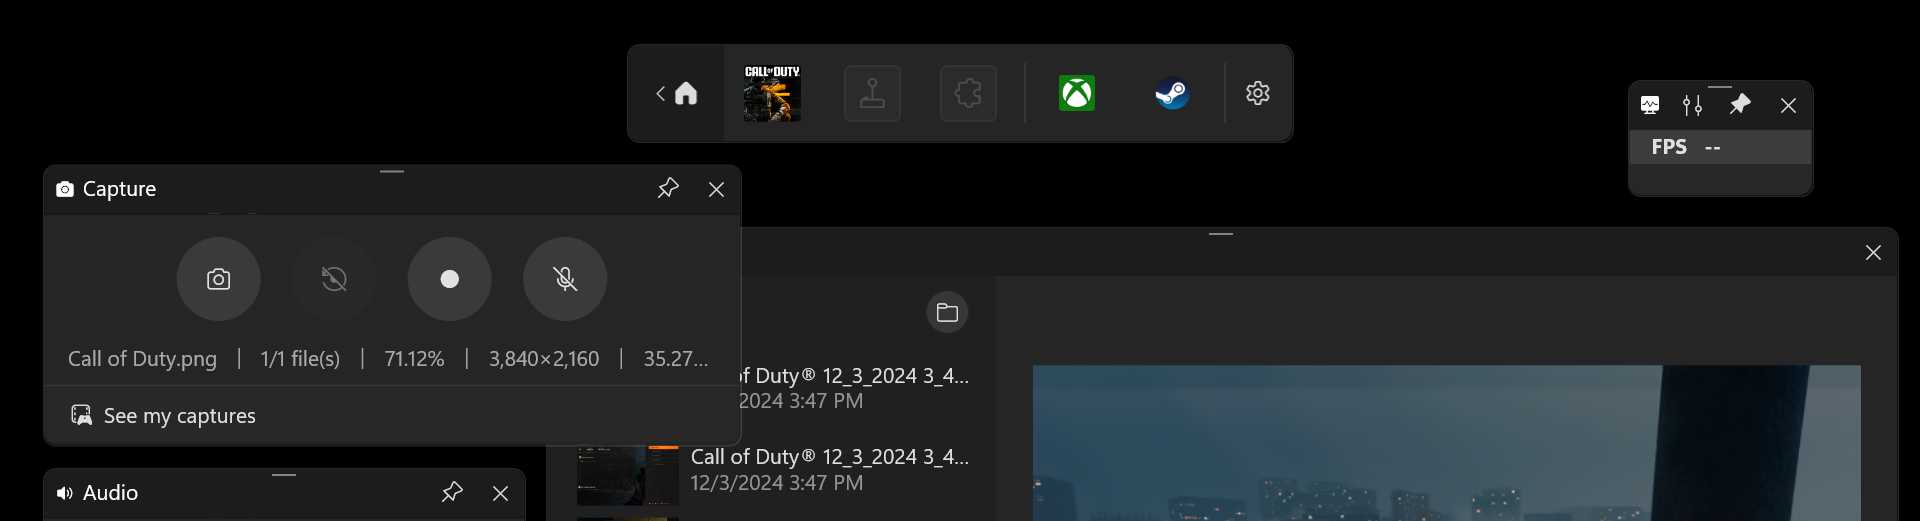
Capture. This handy overlay is the front-end for all of your game screenshot and video recording endeavors.
We cover these capabilities later in this chapter.
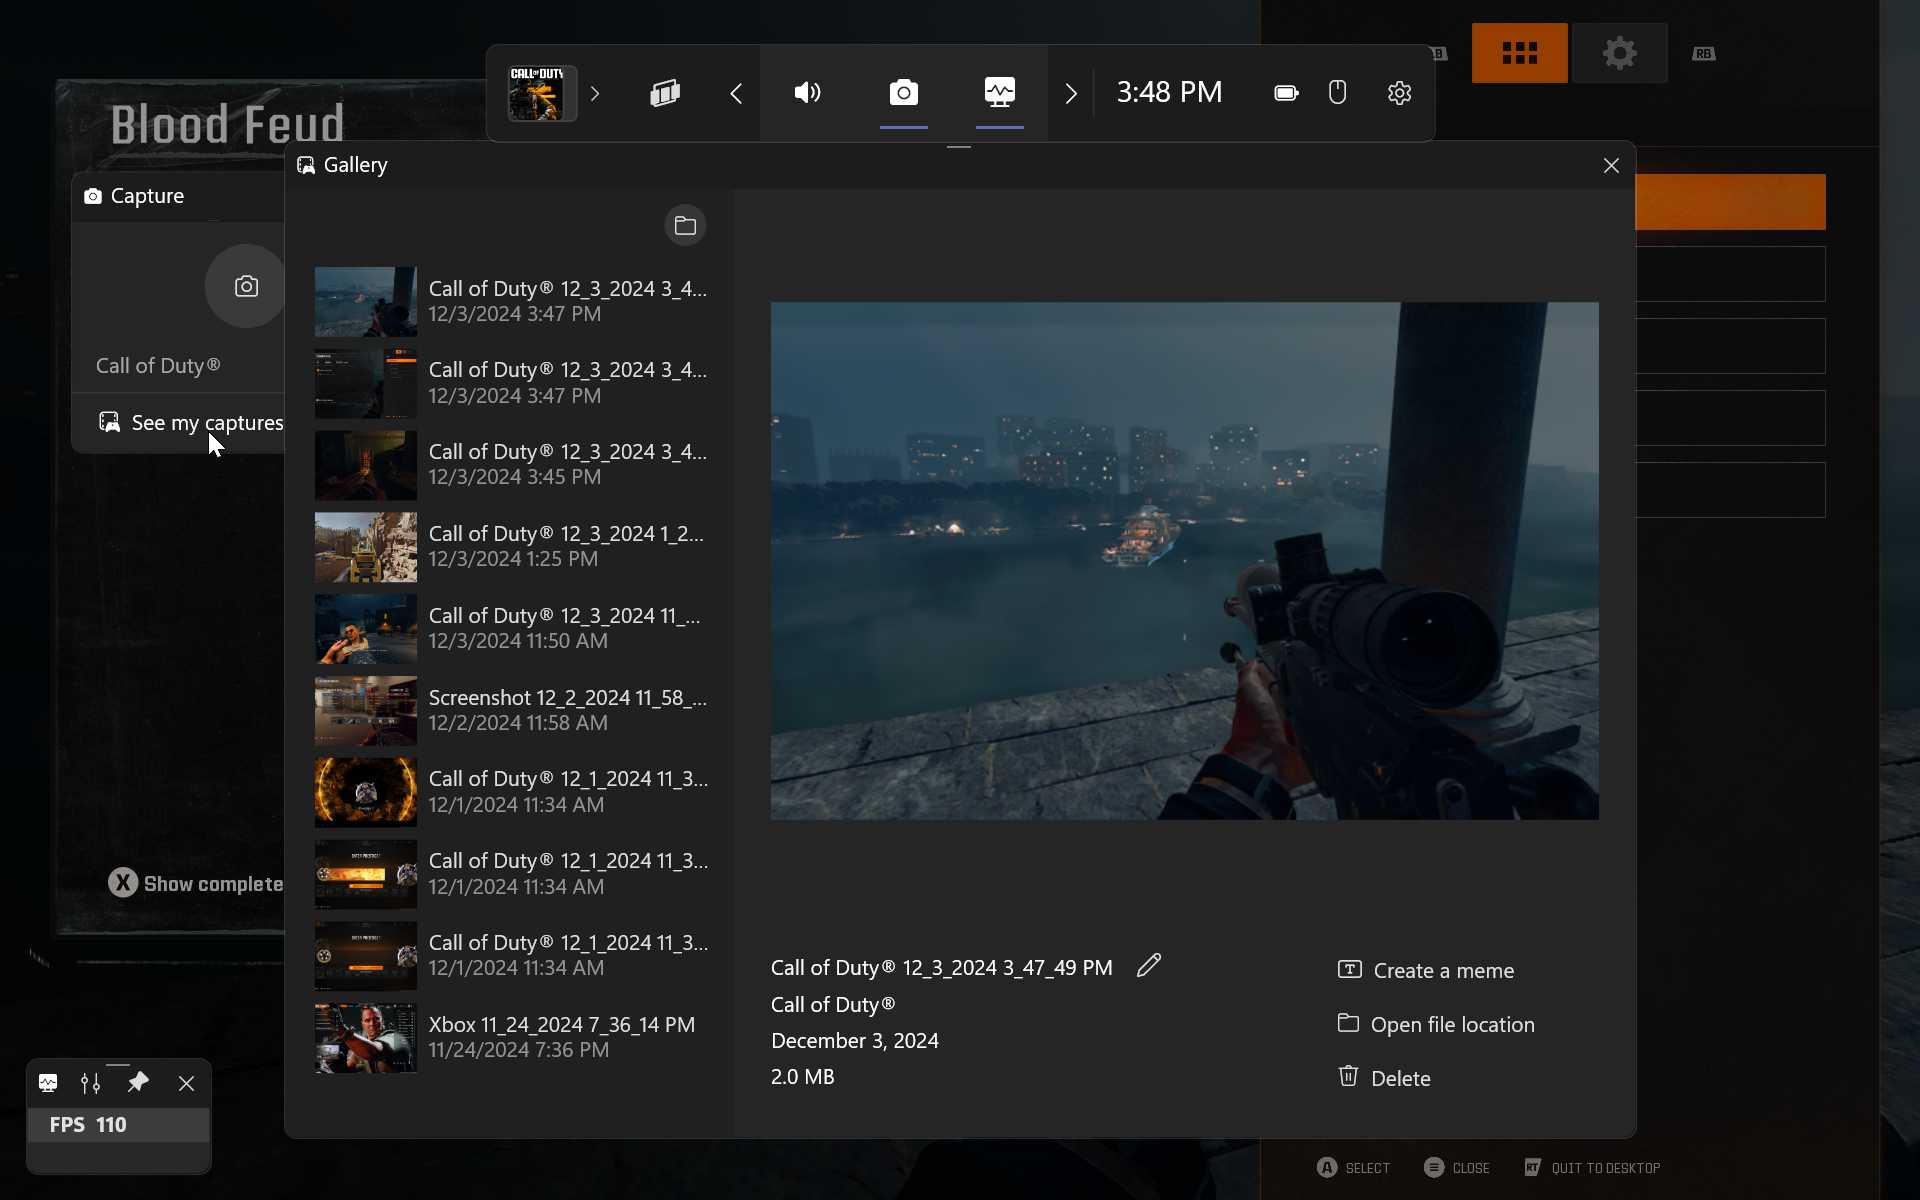
Gallery. This overlay displays all the screenshots and video clips you’ve captured on this PC (and only this PC) so that you can view them or access the location in the file system where they’re stored. From there, you can use other apps to edit them, if needed, or share them with others using the system Share capabilities.
Microsoft no longer offers an app or website that lets you view all the screenshots and video clips you’ve recorded across your PCs and Xbox consoles. If this is important to you, consider syncing the Videos folder with OneDrive’s Folder backup feature on each PC you use. Then, configure your Xbox console to automatically upload your captures to OneDrive. You can learn how to do that on the Xbox Support website.
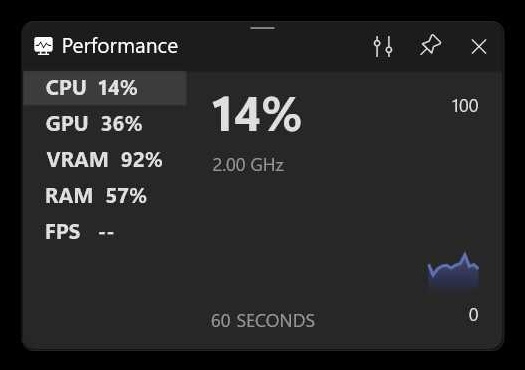
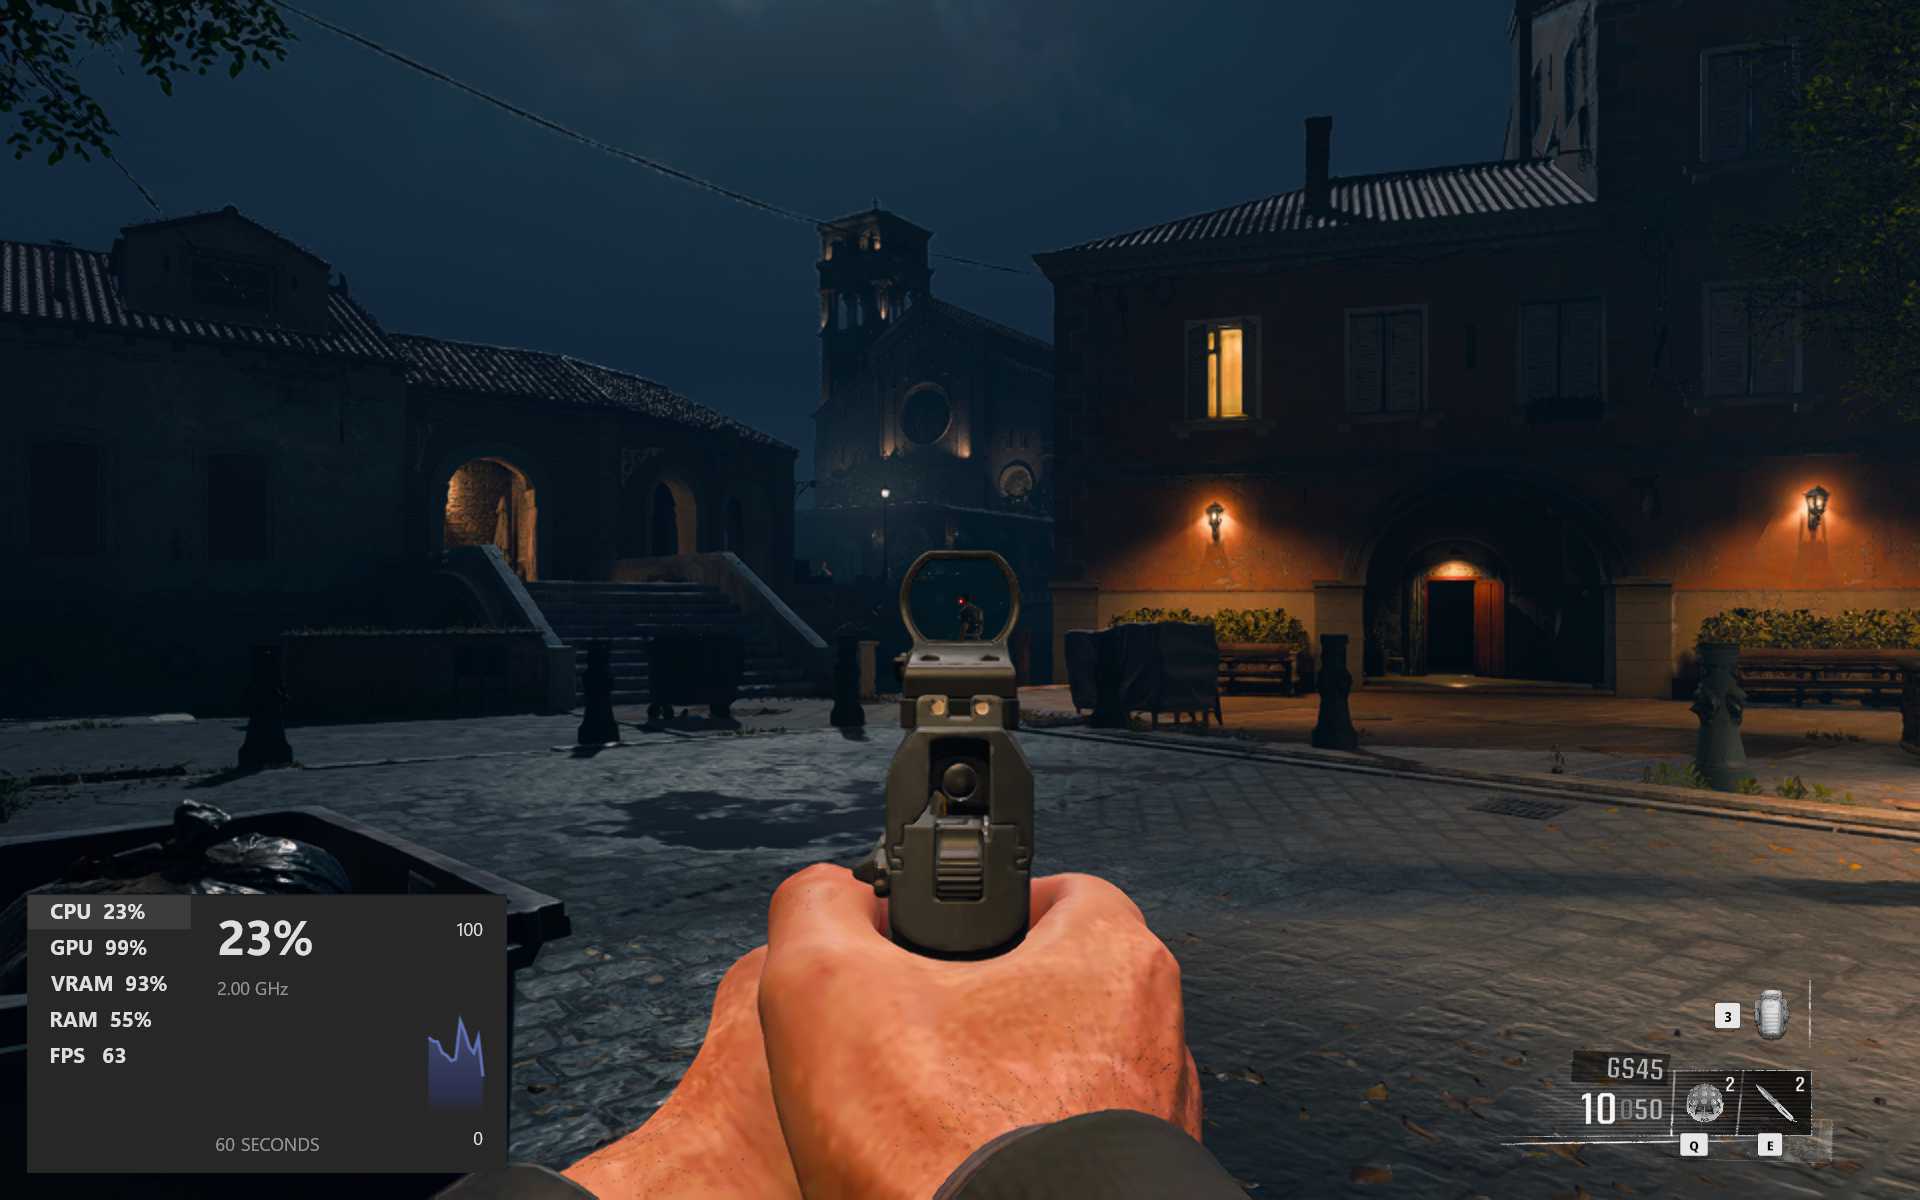
Performance. This widget provides a real-time peek at your PC’s CPU, GPU (graphics), VRAM (video RAM), and RAM utilization, and it displays the frequency at which games animate in FPS (frames-per-second). Those who like to tinker with specific in-game settings can use this overlay as a dashboard of sorts that displays the real-world impact of those changes so you can continue tweaking accordingly until it’s working the way you prefer.

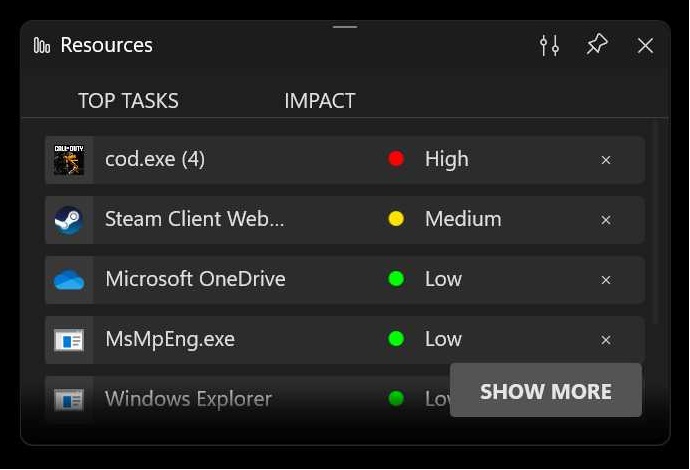
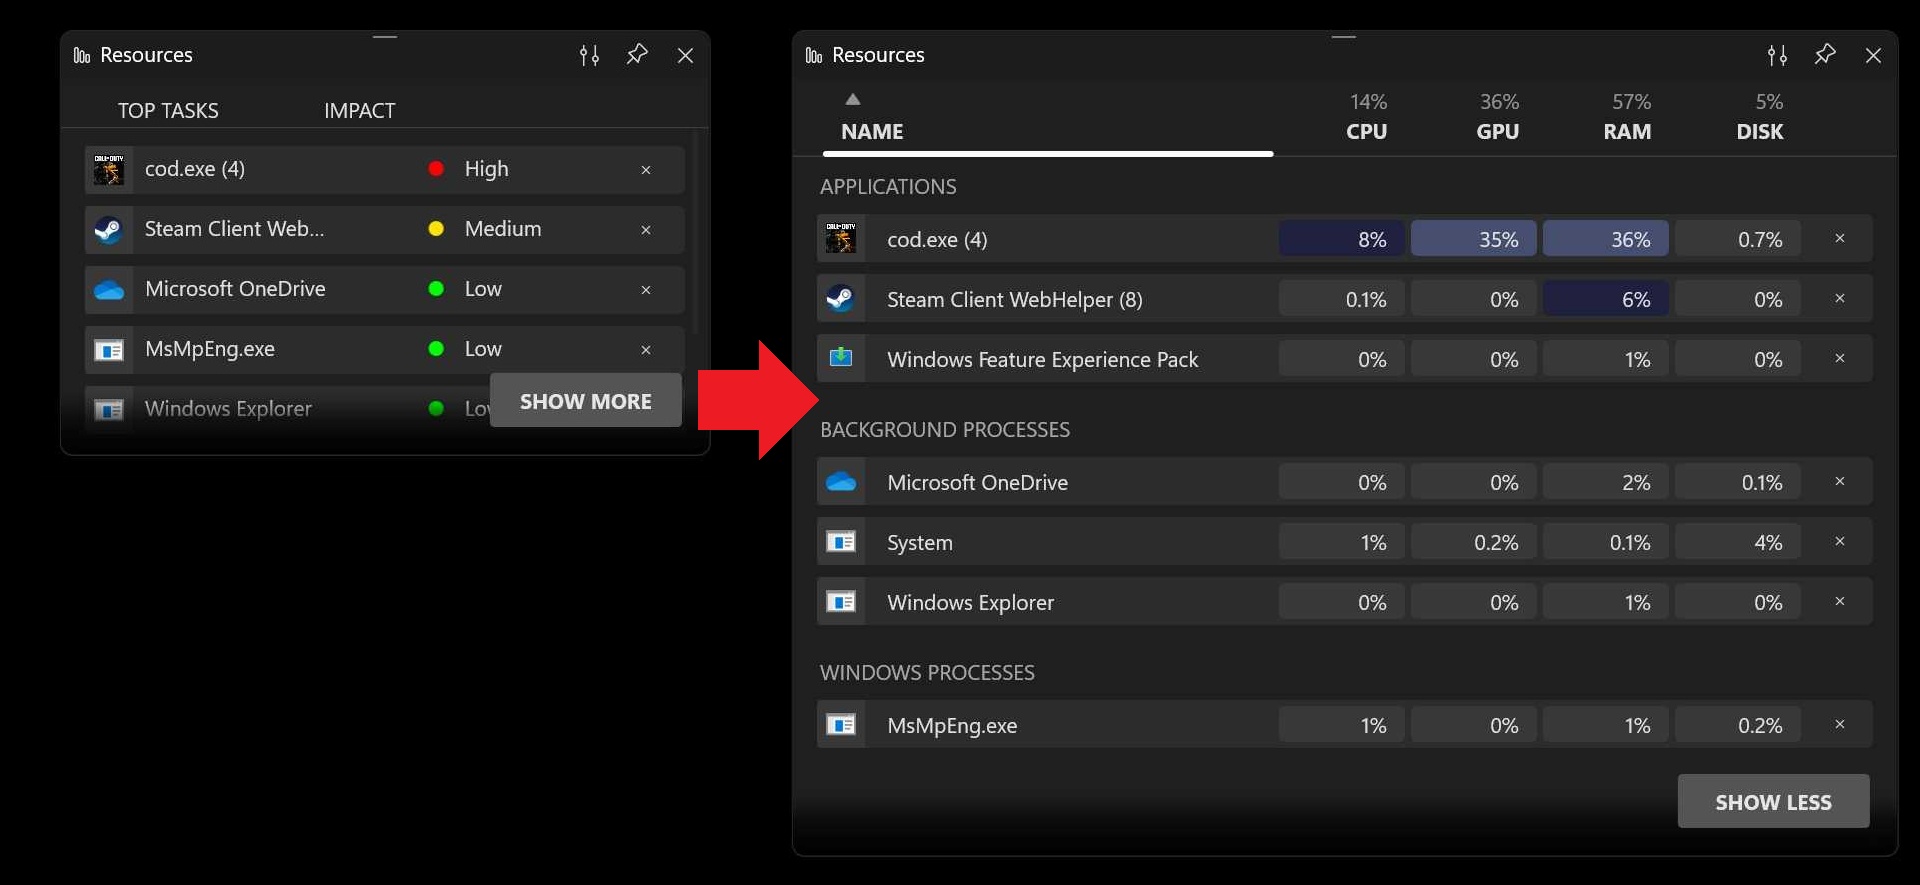
Resources. This widget is a dashboard similar to Task Manager in Windows that displays the overall impact on system resources–CPU, GPU, RAM, and disk–as well as the individual impact by each game, application, and service that’s currently running on your PC. You can use this to identify processes that are consuming too many resources so you can stop them while playing games to get the best possible experience.
Spotify. Those who would like to listen to a personal soundtrack while playing games can do so via the Spotify music subscription service. This widget provides a front-end to your Spotify music library, plus hand-picked video game playlists provided by the service. You can optionally redirect the Spotify-based music to any Spotify-compatible speakers, separate from the in-game audio, as well.
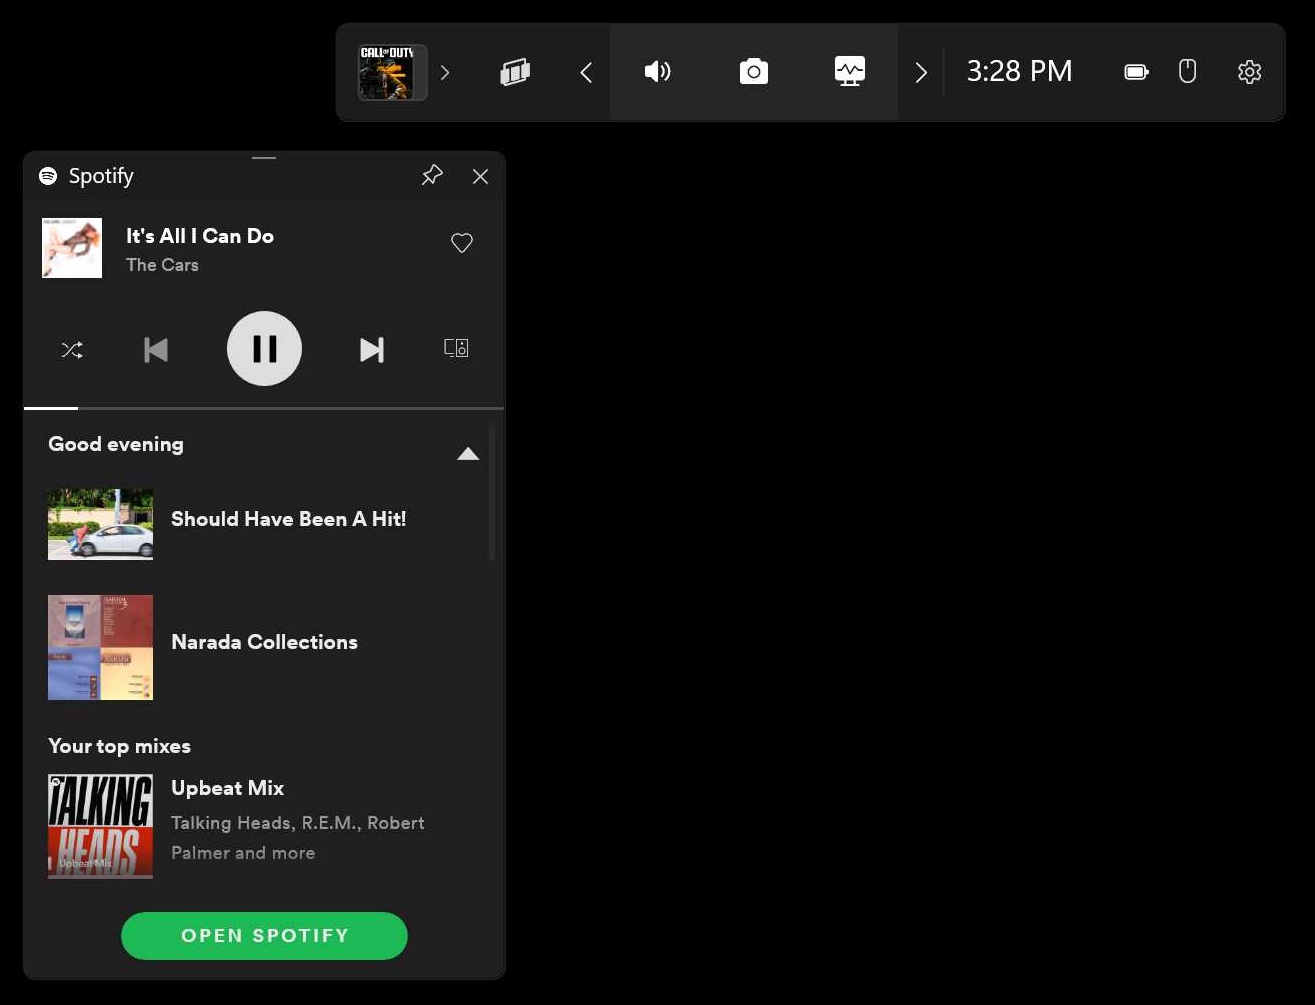
To use this feature, you must have a Spotify account and the app must be installed from the Microsoft Store (as it is by default on most Windows 11 PCs).
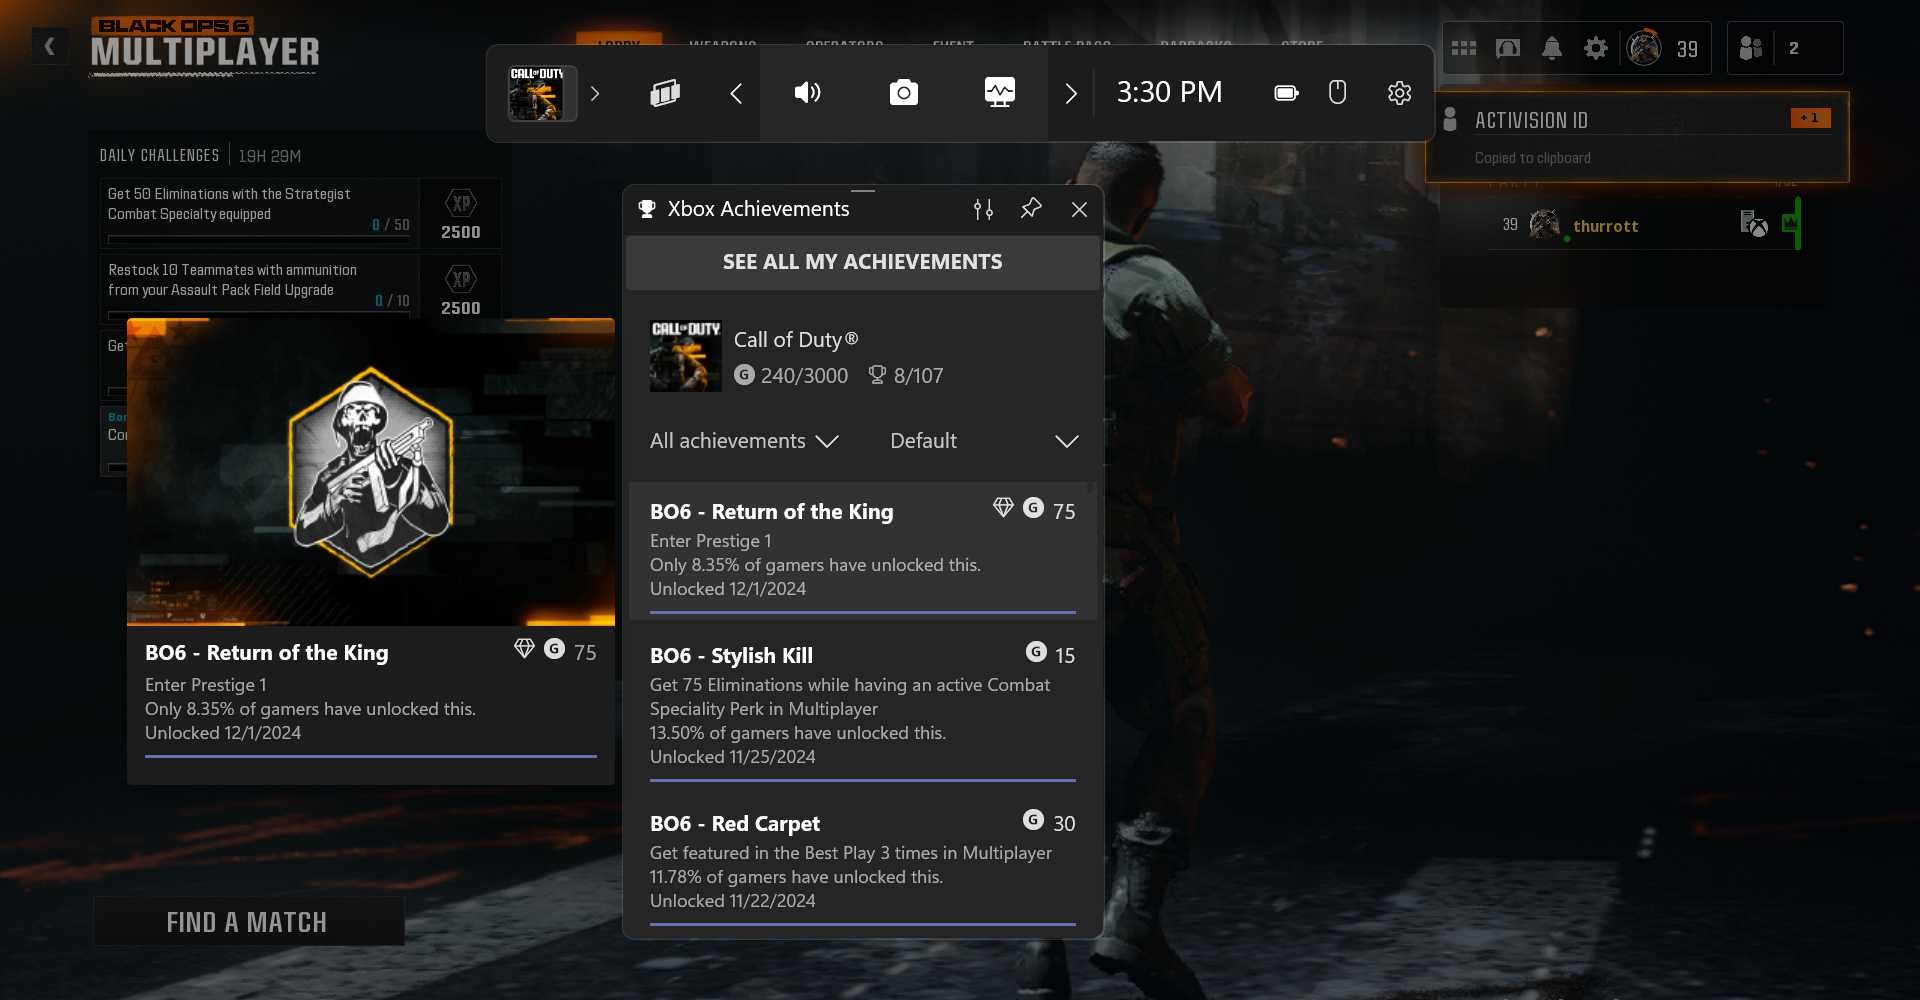
Xbox Achievements. When you’re playing an Xbox game–that is, a game you’ve installed through the Xbox app–this overlay displays information about your progress obtaining in-game Achievements. You can filter the view to show only those Achievements that are rare and/or not yet obtained, and display the Achievements by progress, gamerscore, rarity, or commonality.
Xbox Chat. This overlay provides a lightweight way to chat with one or more friends on Xbox Live while you play. This chat is text-based by default, but you can also use this widget to start an Xbox party chat that supports text and voice.
Xbox Looking for Group. Looking for Group (LFG) is like Craigslist but for Xbox games, a social destination on Xbox Live that helps you find players you don’t already know to play the games you like the most. This widget lets you scan through a list of available games, read posts from others looking to form a group, and create your own posts. In each case, you can specify options like chat preferences, times, languages, and more.
Xbox Social. This widget is a front-end for the social features on Xbox Live. You can use it to see which of your friends are online–and, if so, which game they’re playing–browse suggested friends and friend requests, view notifications, link to your friends on Steam, search for players you recently competed against, or start a new chat or party chat
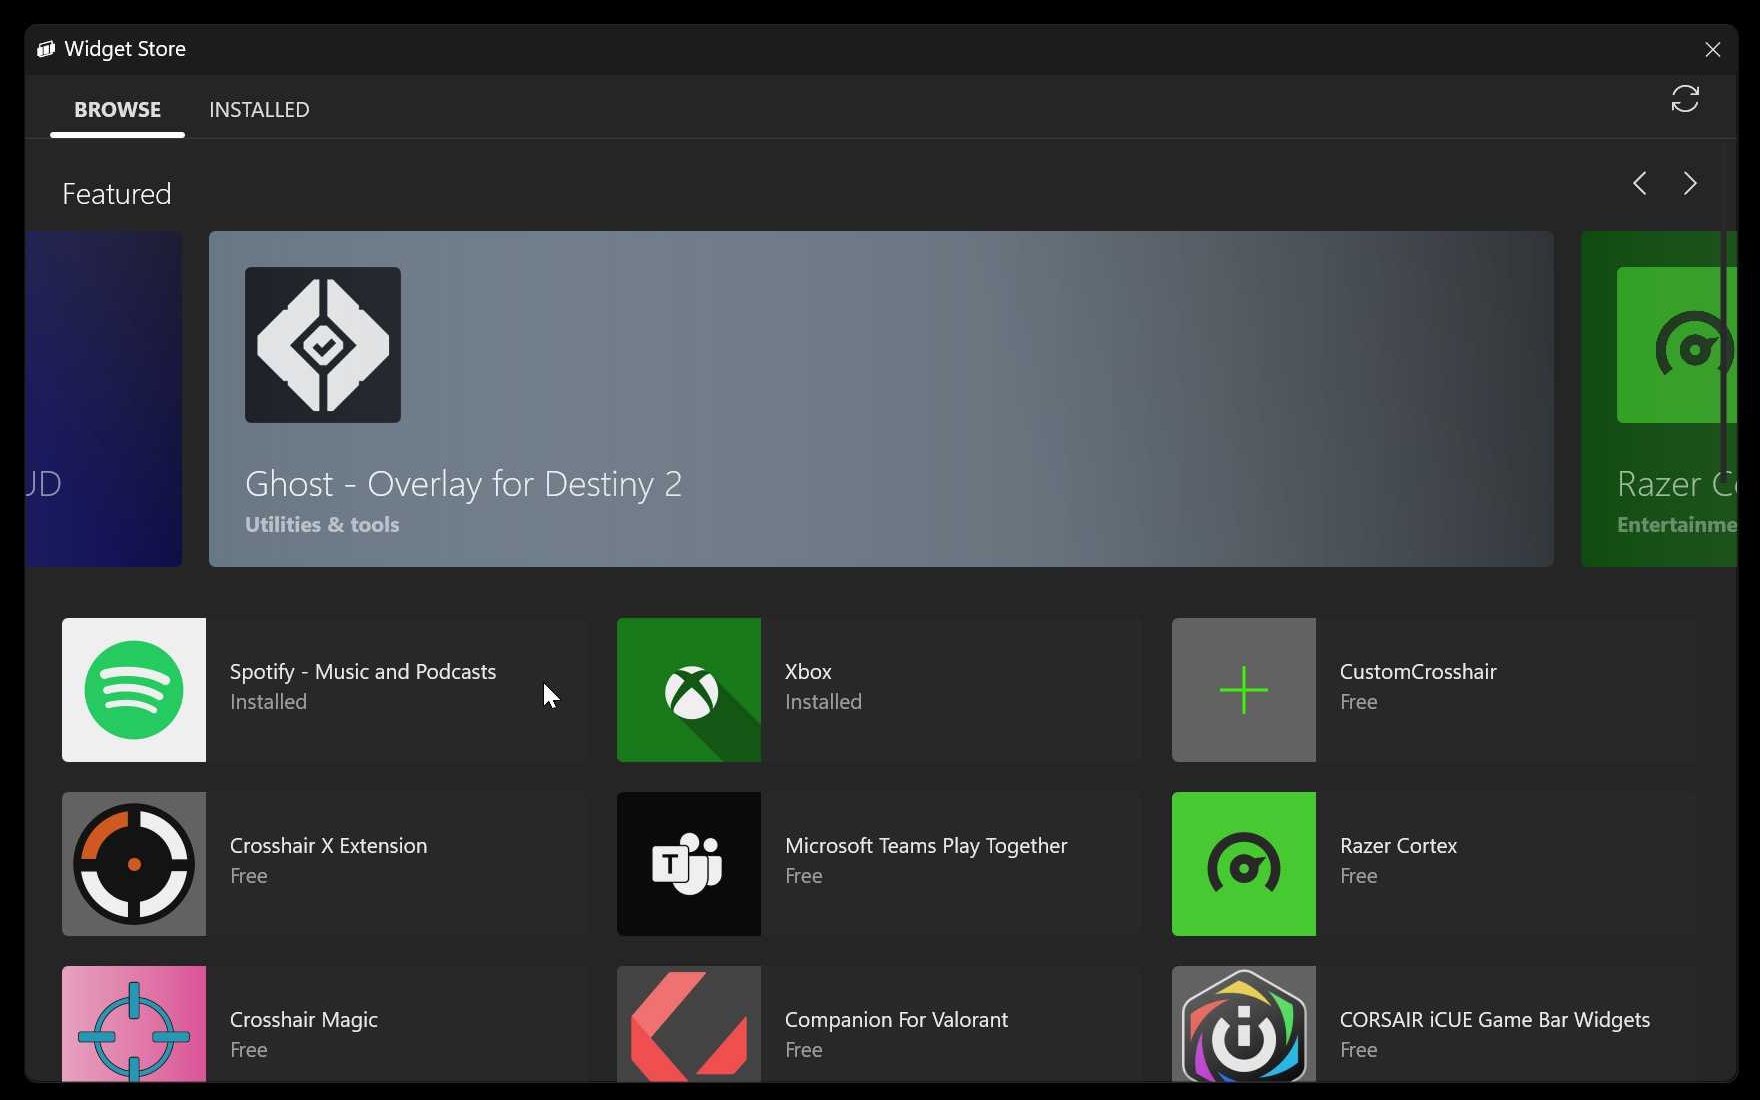
Widget Store. The Game Bar is extensible by third-party developers, and you can find their offerings in this Widget Store. Unfortunately, most of the available widgets are non-essential for most gamers, and many are tied to esoteric gamer hardware or services.
Customize a widget
All widgets offer at least some form of customization. For example, you can position any widget anywhere on-screen you like, and it will retain that position each time you open the Game Bar. Likewise, many widgets are resizable: You can simply grab an edge as you do with any window to resize it as desired.

Beyond that, the customization capabilities vary by widget. Some widgets offer buttons and other user interfaces for customization: For example, the Resources widget has a “Show more” button that expands the view dramatically. (And a corresponding “Show less” button for getting it back to the default view.)
Most customizable widgets display an “Options” button that resembles two sliders on a sound mixer board.
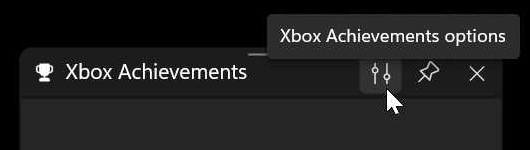

When clicked, the widget will show options specific to that widget. For example, some allow you to override the default transparency setting for all widgets or configure notifications or accessibility settings. These options can vary wildly by widget.
Add a widget to favorites
You can favorite widgets that you wish to see every time you display the Game Bar. This works similarly to favorites in Microsoft Edge (or bookmarks in other browsers). That said, the Game Bar is configured with a set of favorites–Audio, Capture, Performance, and Xbox Social–by default.But you can configure any widget as a favorite–or remove a widget from favorites–at any time.
To do so, display Game Bar and click “Widget Menu.” Then, click the “Favorite”/”Unfavorite” (star) icon to the right of any widget you wish to favorite or unfavorite.
Pin a widget so it’s always visible
Most widgets can also be pinned so that they appear over any game you’re playing, even when Game Bar is hidden.
To pin a widget, open Game Bar and then locate the “Pin” button–it resembles a pushpin–to the left of its “Close” (“X”) button. Click “Pin” to toggle it on (or off).

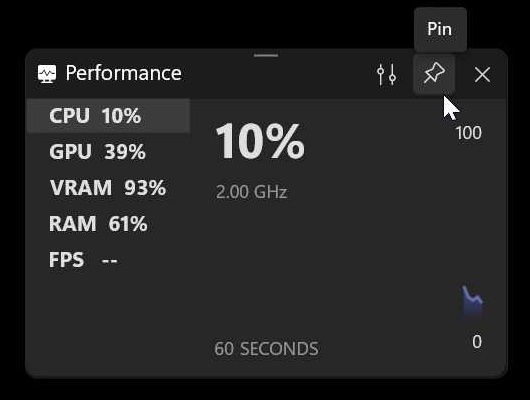
When you do so, the widget remains on-screen.
Though you can interact with it otherwise, you can’t reposition the widget while you’re playing the game. To do that, you need to open Game Bar first.
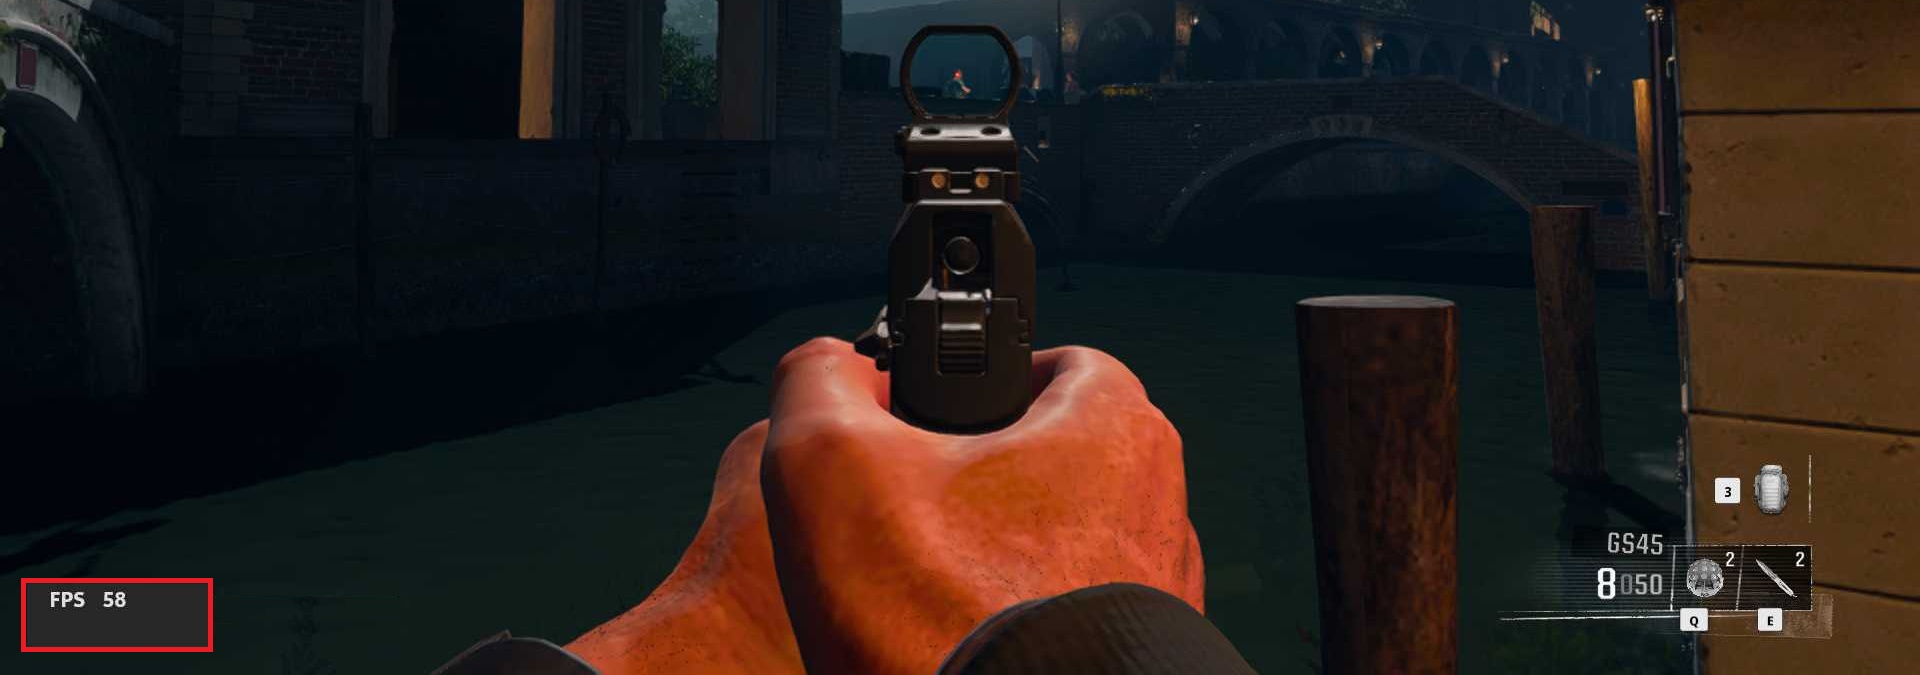
Some widgets can be made smaller, however. For example, when I’m playing Call of Duty or some other game, I often want to display the frame rate (in FPS) in real-time, and the Performance widget provides that information. But it does so along with CPU, GPU, VRAM, and RAM data, plus a chart displaying performance metrics. Fortunately, this widget lets you determine which metrics it displays, so I can disable CPU, GPU, VRAM, and RAM metrics in the widget’s option interface, leaving only FPS available. Then, I can toggle the performance graph off while playing the game, leaving a tiny widget window on-screen that displays only the data I care about.
Use the Game Bar’s other modes
By default, Game Bar displays in the default mode described above. But you can optionally configure it to appear differently using two modes, Compact Mode and Controller Bar, each of which is optimized for specific use cases.
Compact Mode and Controller Bar are similar experiences, and either is a better choice than the default Game Bar if you game using a controller. You should experiment with both before choosing one over the other.
Use the Game Bar in Compact Mode
Inspired by the success of the Nintendo Switch, the game makers at Valve created a portable gaming system called SteamDeck that combines PC hardware components with a small 7-to-8-inch display, a battery, and integrated controller buttons. As a cost-saving measure, SteamDeck runs Linux by default, but Valve supports replacing that with Windows so gamers can access the much wider library of games offered on that platform.
SteamDeck is popular enough that hardware makers like ASUS, Lenovo, and others have launched their own SteamDeck-like Windows 11-based portable gaming systems too. And the market for these mini gaming PCs is now big enough that Microsoft added a new Compact Mode to Game Bar that works well on the small displays provided by these systems.
But you don’t need a PC-based portable gaming system to use Compact Mode. Compact Mode is simpler than the default Game Bar experience, and it’s optimized for use with an Xbox Wireless Controller: In Compact Mode, Game Bar displays only a single widget at a time, and the interface uses larger, more easily seen on-screen elements that take on more of a full-screen look, with interactive buttons on the top-left and non-interactive displays on the top-right.
To enable Compact Mode, open Game Bar, click “Settings,” and then enable the “Compact Mode” toggle under General.
You can navigate in Compact Mode using a keyboard or mouse, but as noted, it’s optimized for the controller: You use the Left Bumper and Right Bumper to navigate left and right, respectively, through the available widgets–as determined by those you favorited earlier–and then press Up or Down on the controller’s d-pad (direction pad) to move through the available controls on the selected widget.
To select a control, just click the “(A)” button on the controller. To exit Game Bar in Compact Mode, click “(B)”.
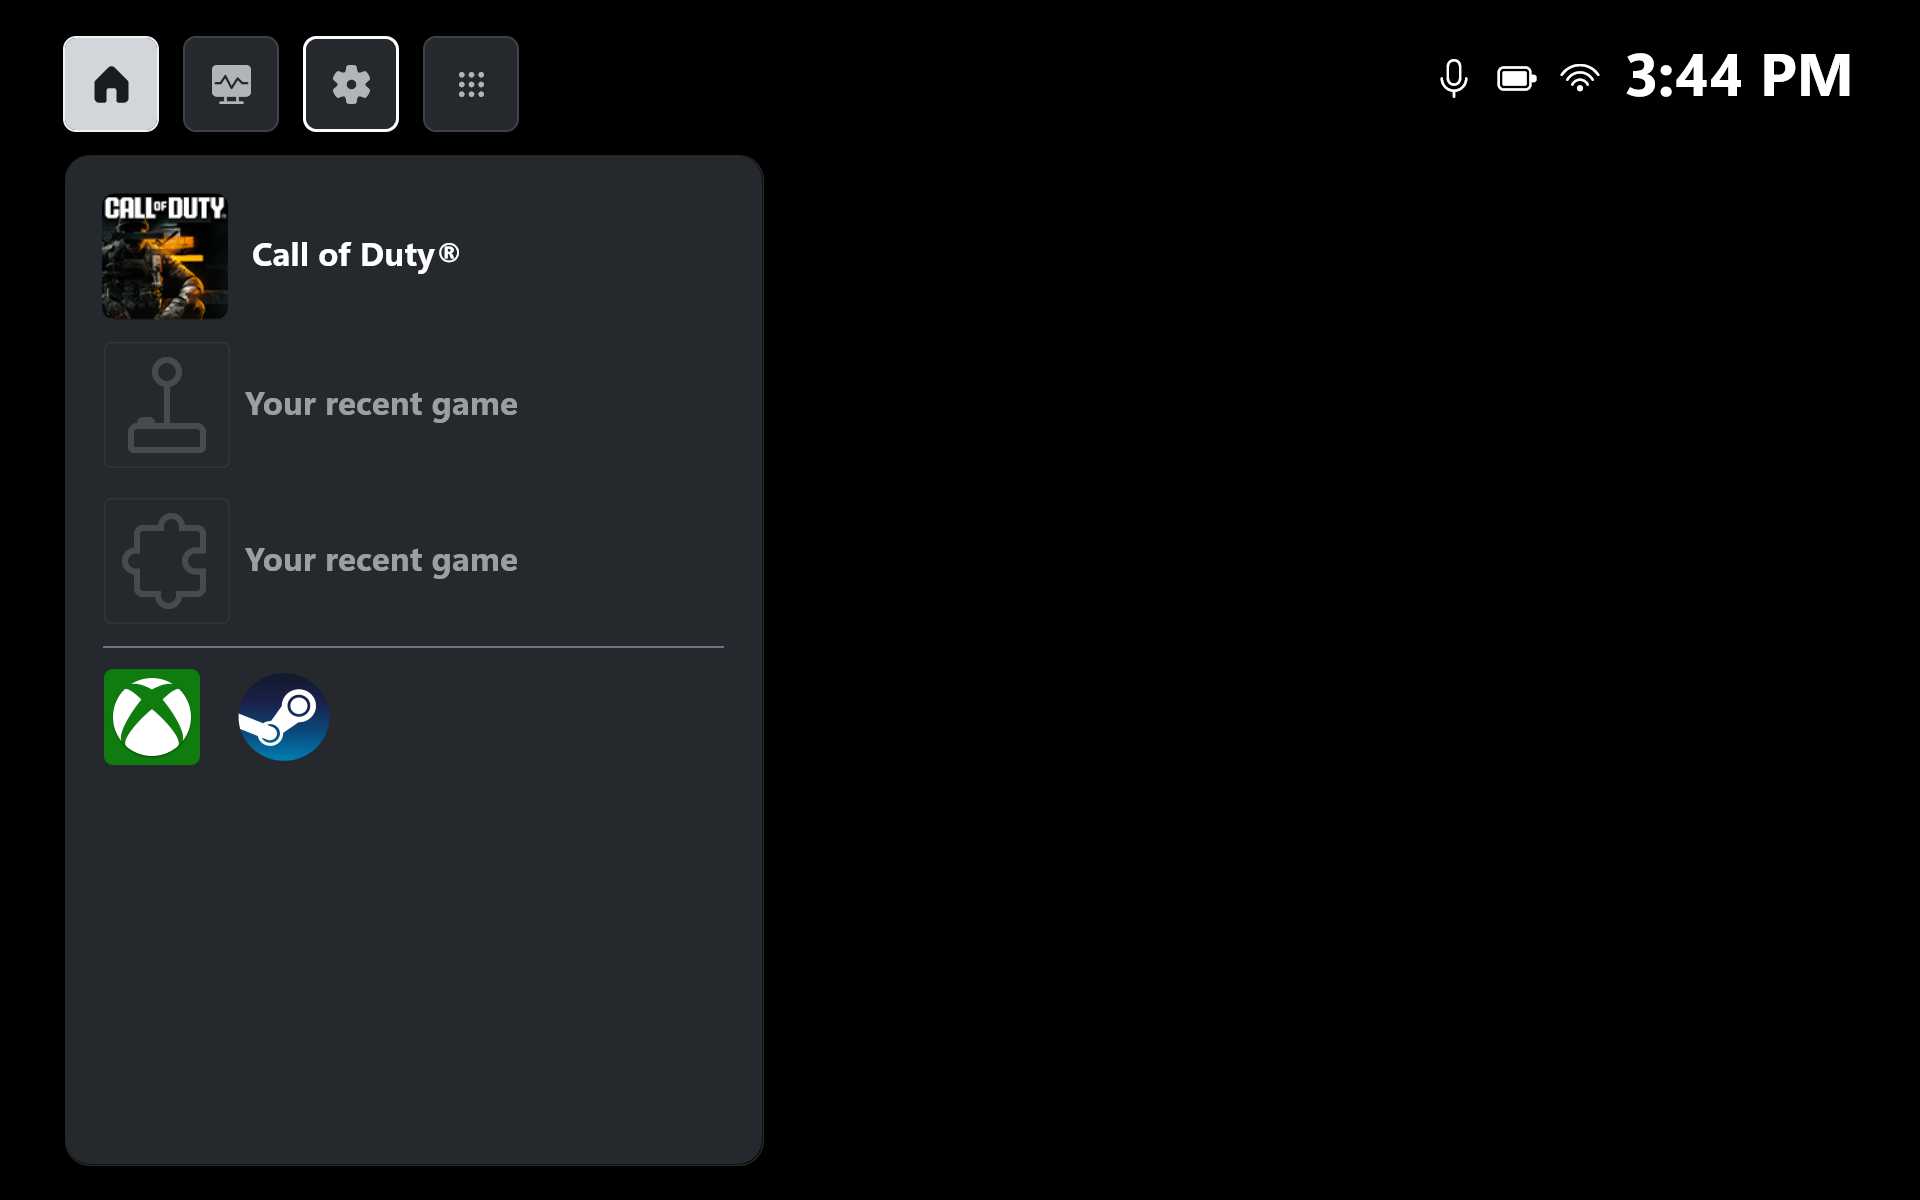
The unique “Home” widget in Compact Mode provides quick access to recently played games and to game launchers like Xbox (which is, of course, configured by default), Battle.net, EA Play, Riot Games, Steam, and Ubisoft Connect.
Third-party game launchers will appear here automatically after you install them normally.
Most Game Bar functions work normally while its in Compact Mode. But there are a few missing features: You can’t pin a widget in this mode or favorite/unfavorite widgets, for example. And some third-party “crosshair” widgets don’t work.
Use the Controller Bar instead of the Game Bar
If you play games on your PC with an Xbox Wireless Controller, you can alternatively choose another Game Bar mode called Controller Bar. Controller Bar is like a happy medium between the default Game Bar and Compact Mode: It retains the multi-window layout of the former but also displays your three most recently played games and installed game launchers like the latter.
You can toggle Controller Bar on from the default Game Bar: Just click the left-most button in the Home Bar, called “Controller Bar.”

When using the Controller Bar, there’s a new “Home Bar” button on the far left that lets you get back to the default Game Bar.
If you want to use the Controller Bar by default, open Game Bar settings and navigate to the Shortcuts view. Then, enable the option “Open Controller Bar automatically when a controller is connected” in the Controller section.
Now, when you press the Xbox button on your controller, Controller Bar appears. Widgets work normally with Controller Bar with no limitations.
Capture and view screenshots and game clips
As with an Xbox console, the Game Bar in Windows 11 lets you easily capture and view in-game screenshots and video clips.
Take a screenshot of a game
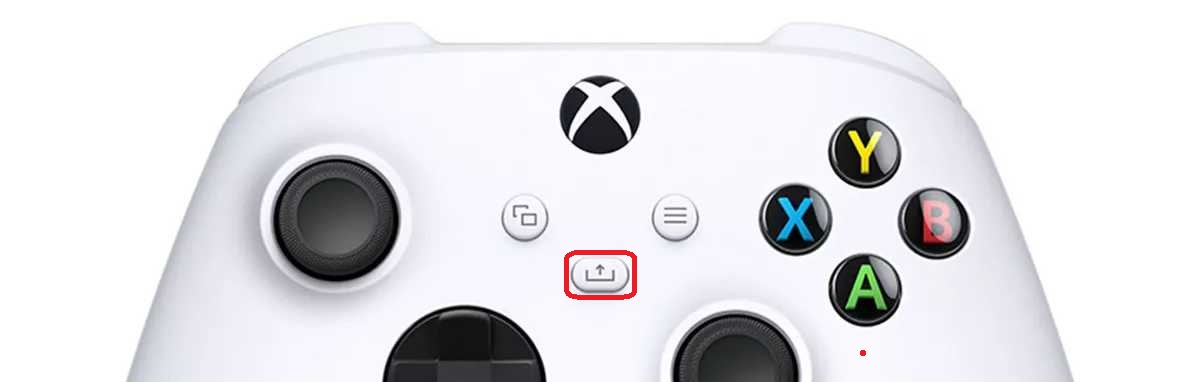
To take a screenshot of a game you are playing, press the “Share” button on the Xbox Wireless Controller.
If you’re using the keyboard and mouse, you have two options. You can open the Game Bar and click the “Take screenshot” button on the Capture overlay. Or, type WINKEY + ALT + PRTSCN.
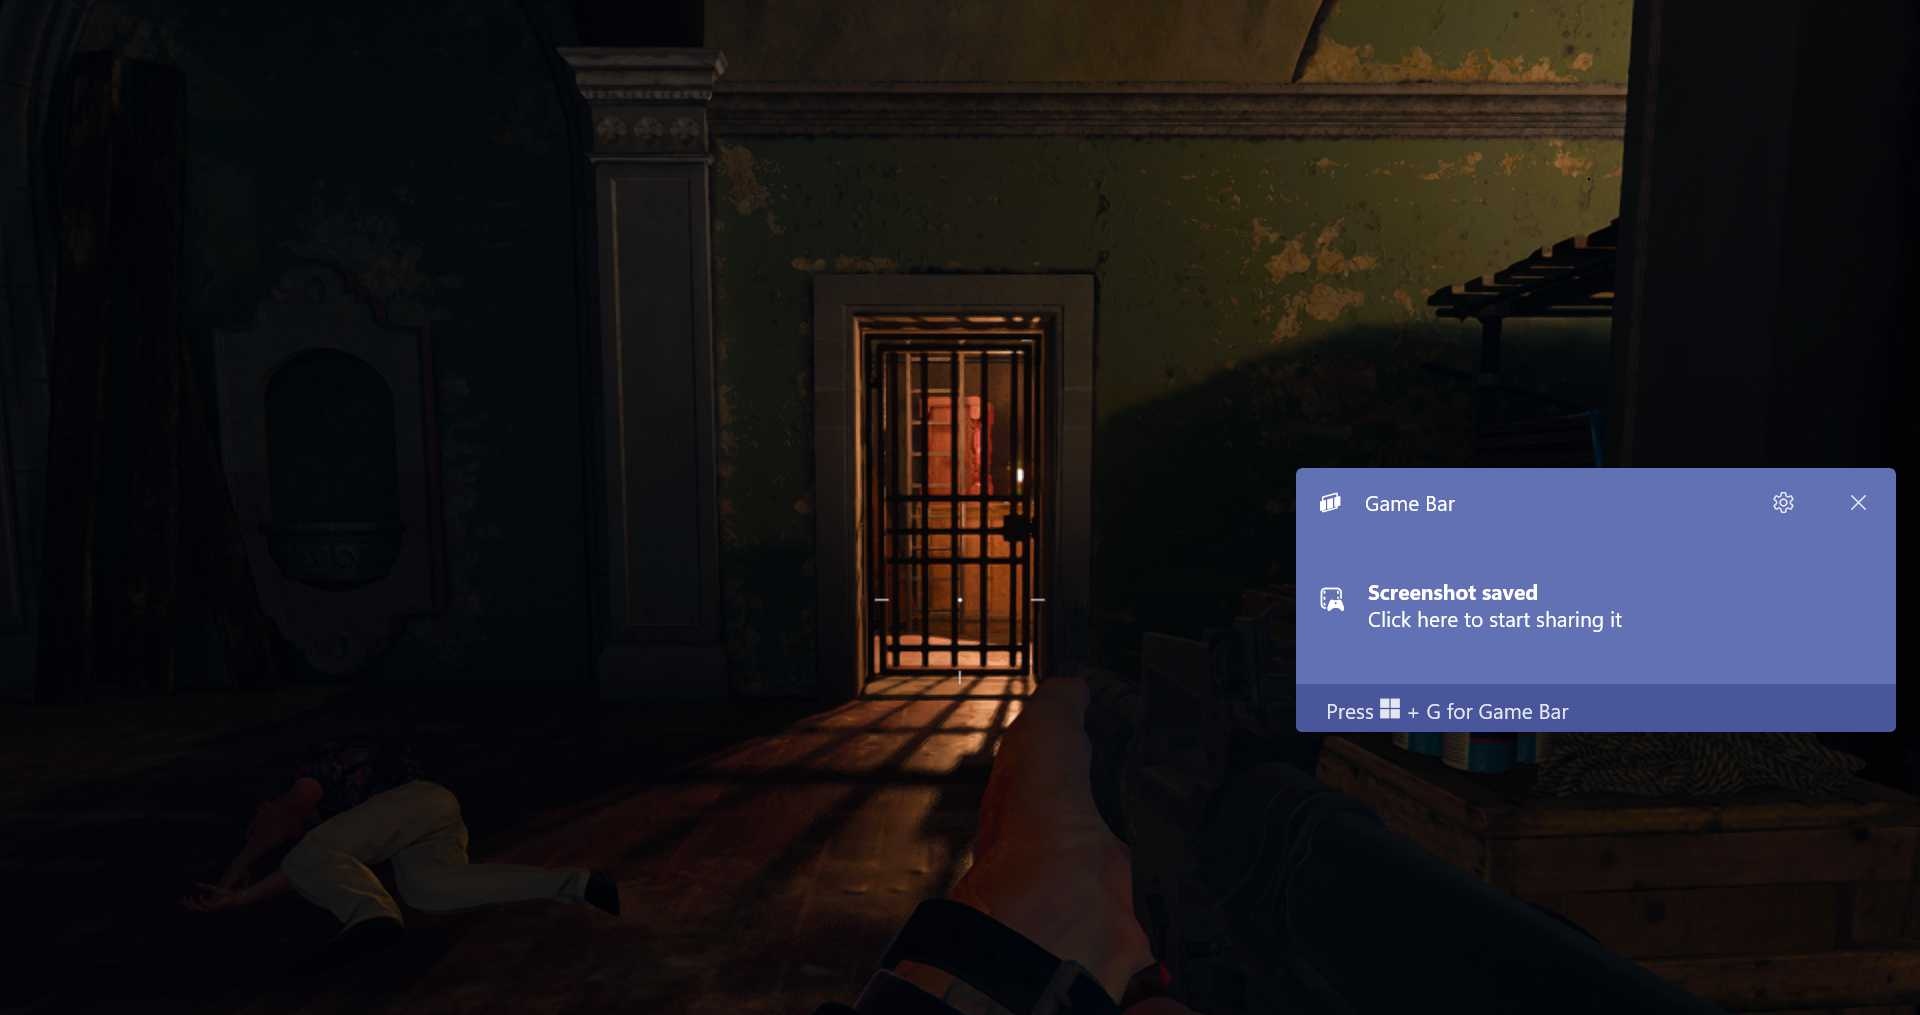
A “Screenshot saved” banner appears on the right middle of the screen when you capture a screenshot.

In-game screenshots are saved to the Captures folder in your Videos folder. (And not to the Screenshots folder in your Pictures folder, as is the case with non-game screenshots.)
You can view your screenshots using the Game Bar. But this doesn’t happen in the Captures widget: It happens in the Gallery widget instead. More on that in a moment.
Record a game clip
In addition to screenshots, the Game Bar lets you capture game clips, which are videos of your in-game play. It supports three types of recordings:
Record last 30 seconds. If something notable just happened in the game you’re playing, you can trigger a recording of the previous 30 seconds of game play to memorialize the moment. To do so, press the Xbox button on your Xbox Wireless Controller, select the Capture widget, and then “Record last 30 seconds” button. (It’s the second of the four button this widget provides.)
Alternatively, type WINKEY + ALT + G to record the last 30 seconds of game play in a single step. Or, open the Game Bar and click “Record last 30 seconds” on the Capture widget.
Start recording. You can manually start a game clip recording–and then stop it–by pressing and holding the “Share” button on your Xbox Wireless Controller.
Alternatively, type WINKEY + ALT + R to start and stop a manual game clip recording. Or, open the Game Bar and click “Start recording” (or “Stop recording”) on the Capture widget.
Record in the background when you’re playing a game. If you would like to always record your in-game adventures to video, you can configure Game Bar to do so automatically. To do so, open Game Bar settings, navigate to Widgets, and enable the option “Record in the background when I’m playing a game.”
While you’re there, consider the recording-related options. You can include the in-game audio, of course, but also audio from a microphone and, if you wish, all other audio from apps and the system.
View a game screenshot or clip
Screenshots and game clips are saved as standard media files (PNG and MP4 formats, respectively) to your PC’s hard drive, but you can view them directly from the Game Bar without leaving the game first or going back to the Desktop. To do so, open the Game Bar and then open the Gallery widget. (If it’s not a favorite, you can open it from the Widget Menu.)
What you can’t do is share them directly from the Game Bar. Instead, you have to rely on the system Share capabilities and compatible apps in Windows 11 to do that.
Where did it go?
Game Bar previously included built-in sharing capabilities, most recently with the Twitter (now X) social network. But this is no longer possible, and using Share in Windows 11 is at least consistent with the rest of the platform.

Gain unlimited access to Premium articles.
With technology shaping our everyday lives, how could we not dig deeper?
Thurrott Premium delivers an honest and thorough perspective about the technologies we use and rely on everyday. Discover deeper content as a Premium member.