Paint (25H2)
- Paul Thurrott
- Apr 12, 2026
-
0
As with Notepad, another in-box app that dates back to the earliest days of Windows, Microsoft has extensively updated Paint since the initial release of Windows 11. Some of these updates modernized the user interface, adding support for system features like Dark mode. But most of the new features are tied to Paint’s core bitmap image creation and editing capabilities.
✅ Tip: Unlike Notepad, none of Paint’s new features, AI or otherwise, can be disabled. When it comes to Paint, what you see–from a functional standpoint–is what you get.
⚙️ Defaults
The features you see in Paint will vary based on the type of PC you have. That is, regardless of your PC, you will see most of the features that Paint offers. But those with a Copilot+ PC will see additional image creation and editing features. You can see the difference between each by opening the Copilot menu in the Paint toolbar. On most PCs, you will see the following options.
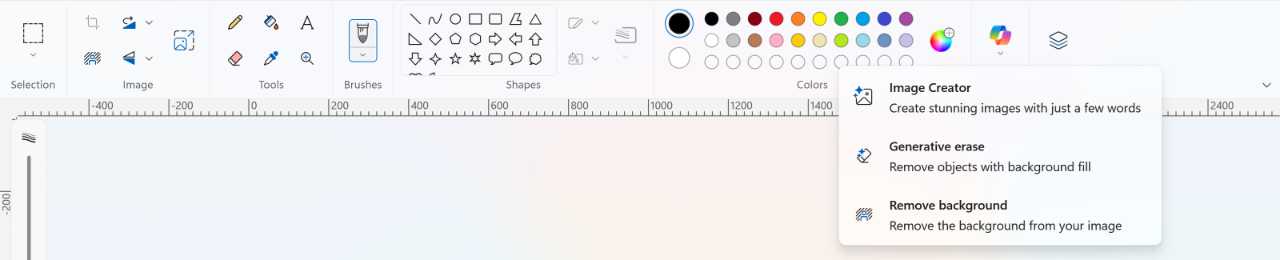
But on a Copilot+ PC, you will see additional options.
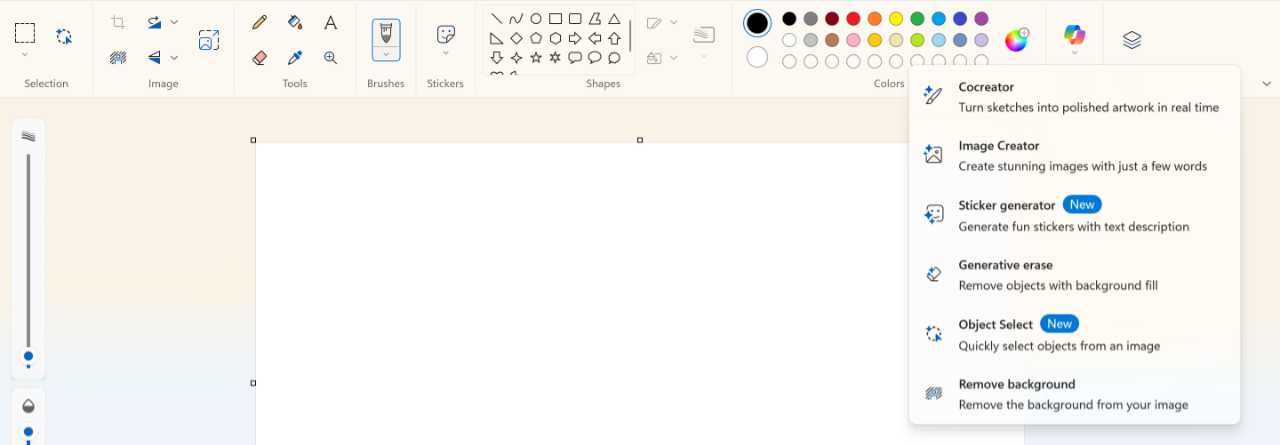
I discuss all these new features in this chapter.
? Customize
Paint doesn’t offer much in the way of customization, and there is no way to disable any of its image creation and editing features, AI-based or not. But here are some key features you can customize:
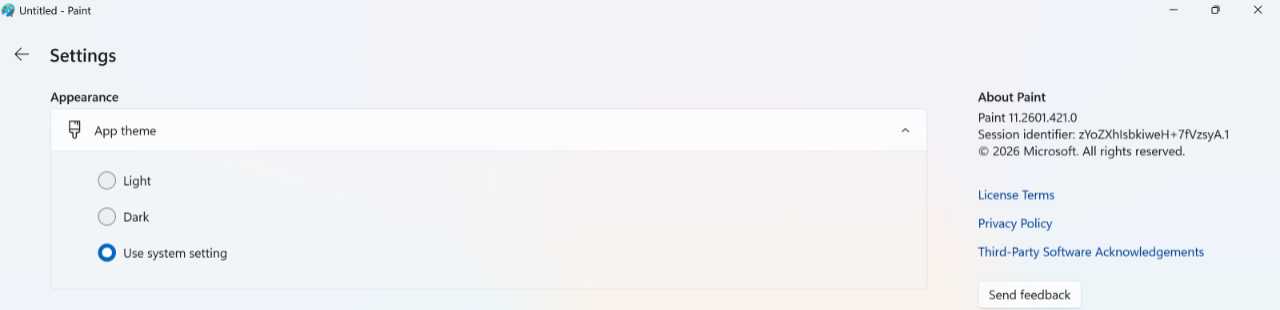
The app theme. By default, Paint will use the app theme—Light or Dark mode—you configured in the Settings app (in Personalization > Colors > Choose your mode). But you can override this choice for Paint only in the app’s otherwise sparse settings interface, which you can find by clicking the “Open settings” (gear) icon in the upper-right of the toolbar.
Whether to add a watermark to AI-generated content created with Paint. By default, Paint doesn’t add a visual watermark to identify when an image you create or edit in the app was made with AI. But you can configure Paint to add that watermark automatically every time or to ask you each time when you save an AI-created image. You do so in Paint settings, as per the above instructions. If you do enable this feature, the watermark will appear as a small Copilot logo in the bottom right of the image.
✅ Tip: This watermark is a so-called content credentials identifier, based on the C2PA standard used by most popular image editing apps. There are two components to it: The small visual watermark that you and other humans can see and some meta-data that lets compatible software programs identify the work as AI-created.
The toolbar. By default, Paint’s rather large toolbar is displayed at the top of the app window, giving you access to its many command-based tools. There’s no way to make this toolbar smaller or to hide specific commands. But you can configure the toolbar to auto-hide if you’d like, in which case you can then use a “Show toolbar” button to the right of the Paint menu and Quick access icons to temporarily display it. To do so, click the small caret (“v”) at the far right of the toolbar and then choose “Automatically hide toolbar.”
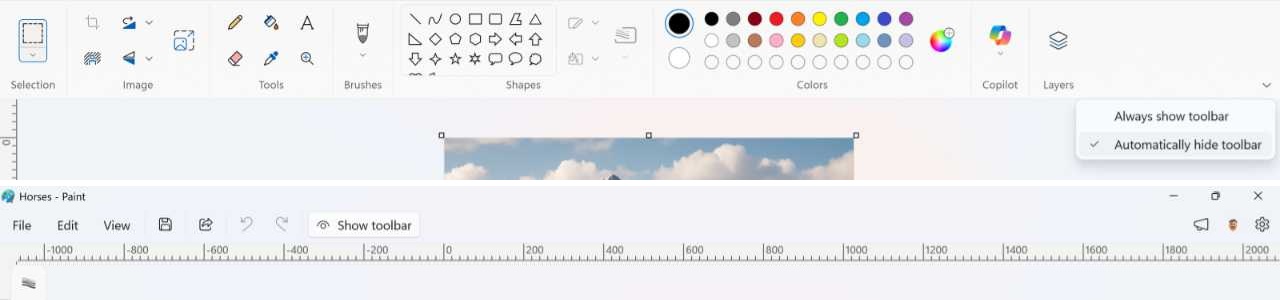
✅ Tip: If you want to see the image you’re working on better, you can tap F11 at any time to view it full screen. Then, you can tap F11 or Esc to return to the normal Paint app display. This is similar to how Microsoft Edge and other web browsers work.
? New Paint features you will see on any PC
After Microsoft announced Windows 11 in mid-2021, it began promoting updates to in-box key apps, including Paint. At first, the changes were mostly visual in nature, with Paint and other apps better conforming to the Windows 11 look and feel. But in time, Paint began to receive functional updates too. These included an updated Text tool, a Photoshop-like layers capability, and transparency support that also allows the app to open and save transparent PNG files; that latter feature works with layers, too, so that you can erase content in one layer and reveal content in a layer below that.
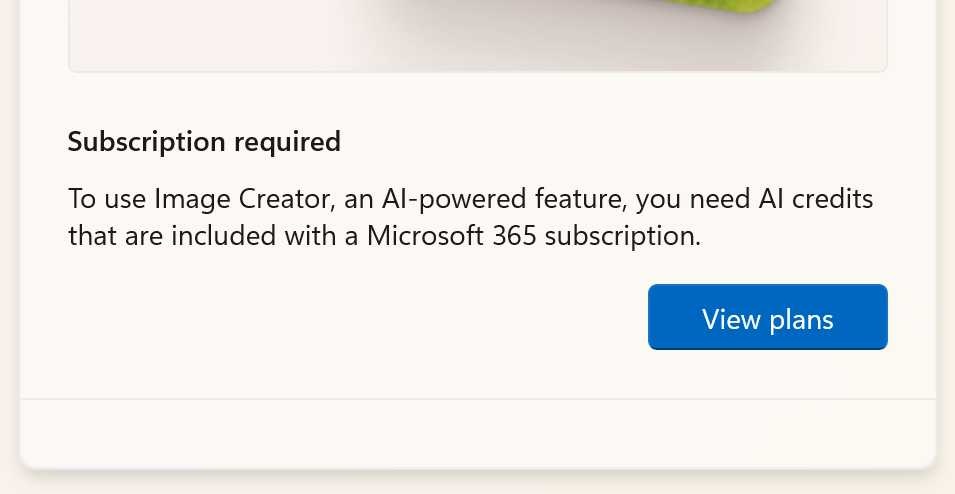
But with Microsoft’s AI push in recent years, Paint started to get a lot more interesting. Today, it offers several new AI-based features, some of which work on any PC and some of which require a Copilot+ PC because they rely on local AI functionality and a powerful NPU. Either way, these new AI-based features are available via a drop-down menu that appears when you click the Copilot button in the Paint toolbar. But there is one complication: Some of the AI-based features that Paint makes available to everyone require a Microsoft account and, more importantly, a Microsoft 365 Personal, Family, or Premium subscription, and you will spend so-called AI credits each time you use those features.
So what does that mean?
According to ? the Microsoft Support website, Microsoft 365 subscribers receive an allotment of AI credits each month, and they can access advanced, cloud-based AI features offered through the subscription by paying for them with these credits. As an example, a Microsoft 365 Personal subscriber gets 60 AI credits each month, and each time they use the Image Creator or Generative erase features in Paint, they spend one AI credit.
✅ Tip: You can review your AI credit balance at any time on ? the Microsoft account website.
If you don’t have a Microsoft 365 subscription, you can’t access those features that require AI credits.
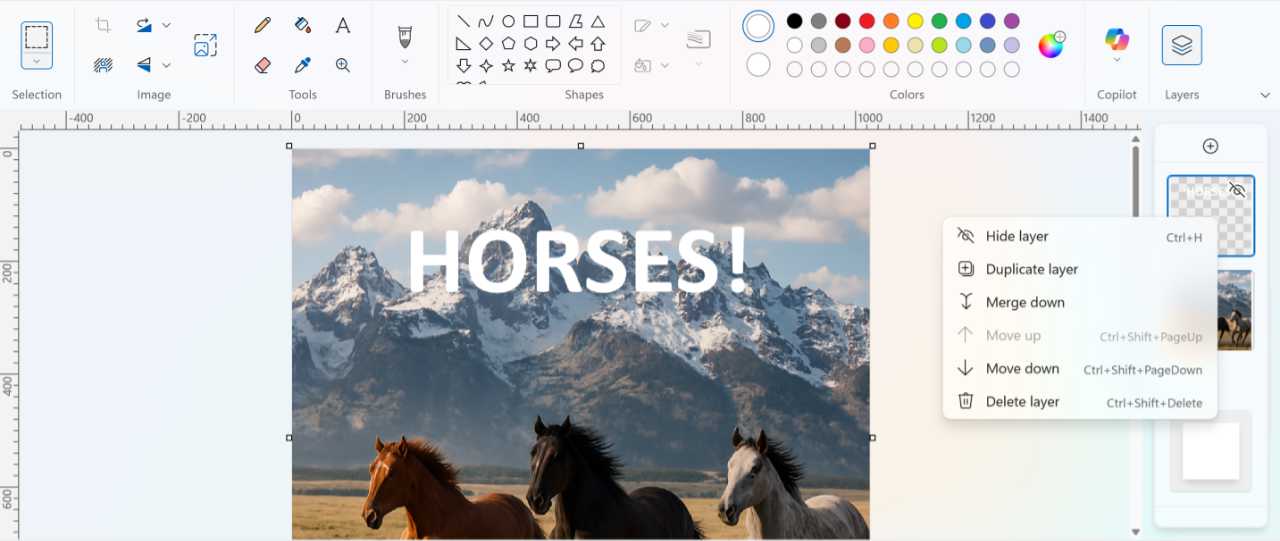
Layers and projects
The layers feature in Paint was useful as originally implemented, but it had one major flaw: Once you were done editing an image with multiple layers, you could save it as a file in PNG or some other image format, but there was no way to edit the layers individually after you closed and re-opened the image. But Paint now offers a related Projects feature that lets you save a Paint project with multiple layers as a .paint file so that you can continue working on these images as needed and never worry about losing the layers data.
To get started, open Paint and optionally open an image file. Then, choose File > Save a project to save it as a Microsoft Paint Project.
⌨️ Keyboard shortcut: Type Ctrl + Shift + S to do this using just the keyboard.
Now, you can add multiple layers to the project, and when you save, it will save that information into the project, not to a static image.
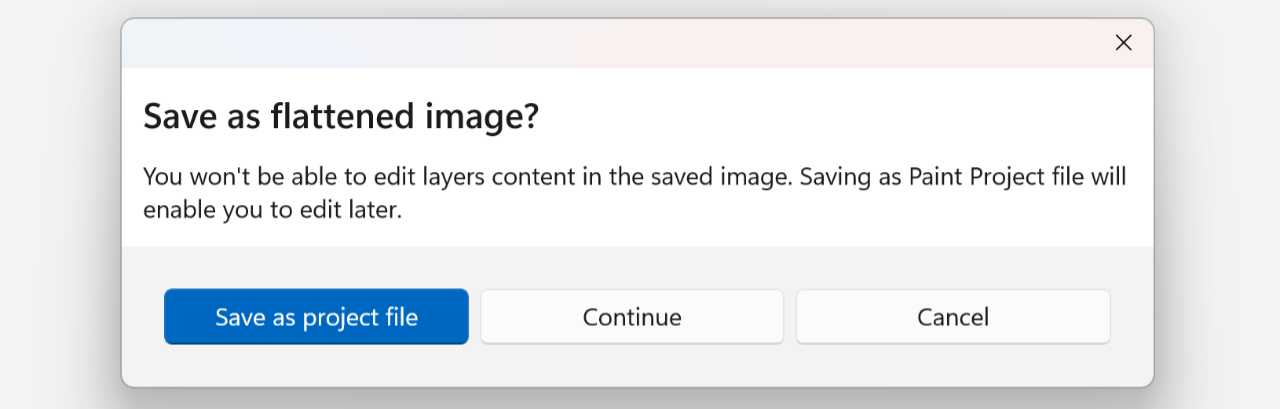
When you’re done editing, save the project. Then, choose File > Save as to save this as a PNG, BMP, or other standard image format as before. Paint will prompt you to make sure you wish to “Save as flattened image.” Click “Continue” to do so.
When you’re done, you will have at least two files, the Microsoft Paint Project file and the image file.
Remove background
Paint includes a useful Remove background tool that does what its name promises, and quite effectively. This one, oddly, is available in two places in the Paint toolbar: As a tool icon in the Image group and through the Copilot drop-down menu. But it’s worth trying if you need this functionality. And unlike some AI-based features in Paint, it’s completely free, with no AI credits required.
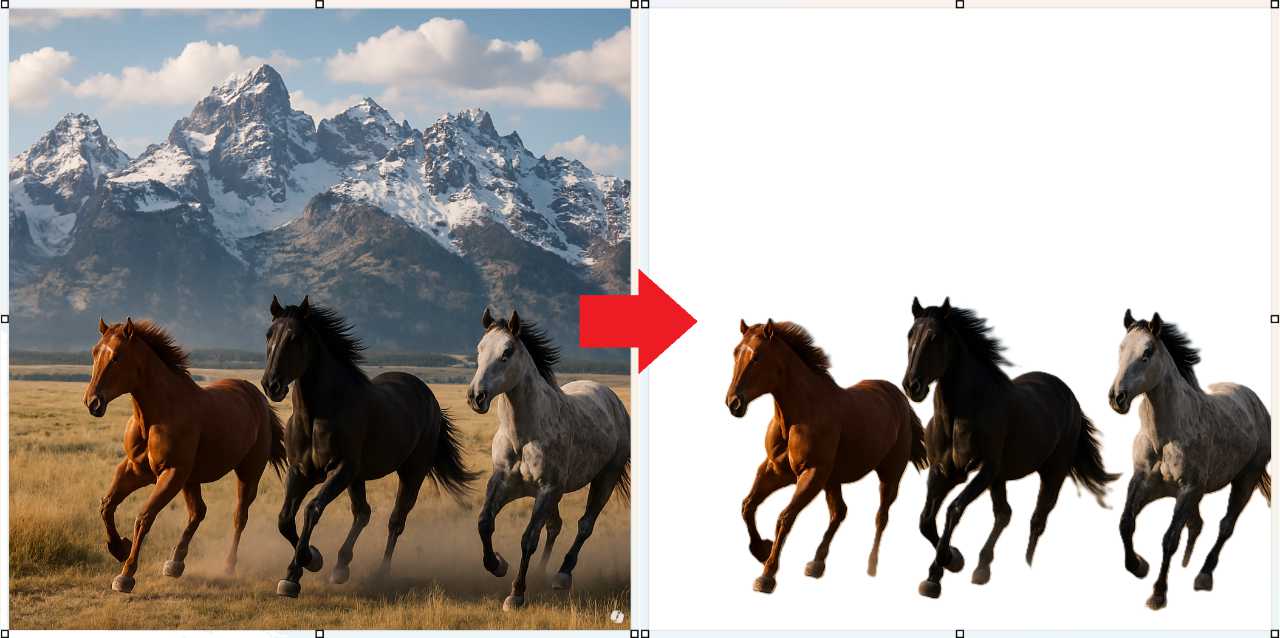
Image Creator
Image Creator is Paint’s version of the image creation capabilities found in OpenAI ChatGPT, Google Gemini, and other AI chatbots: You type a prompt—i.e., describe the image you’d like Paint to create—optionally choose an image style from the “No Selection” drop-down menu, and then the app, powered by OpenAI’s DALL-E image generation AI model, gets to work.
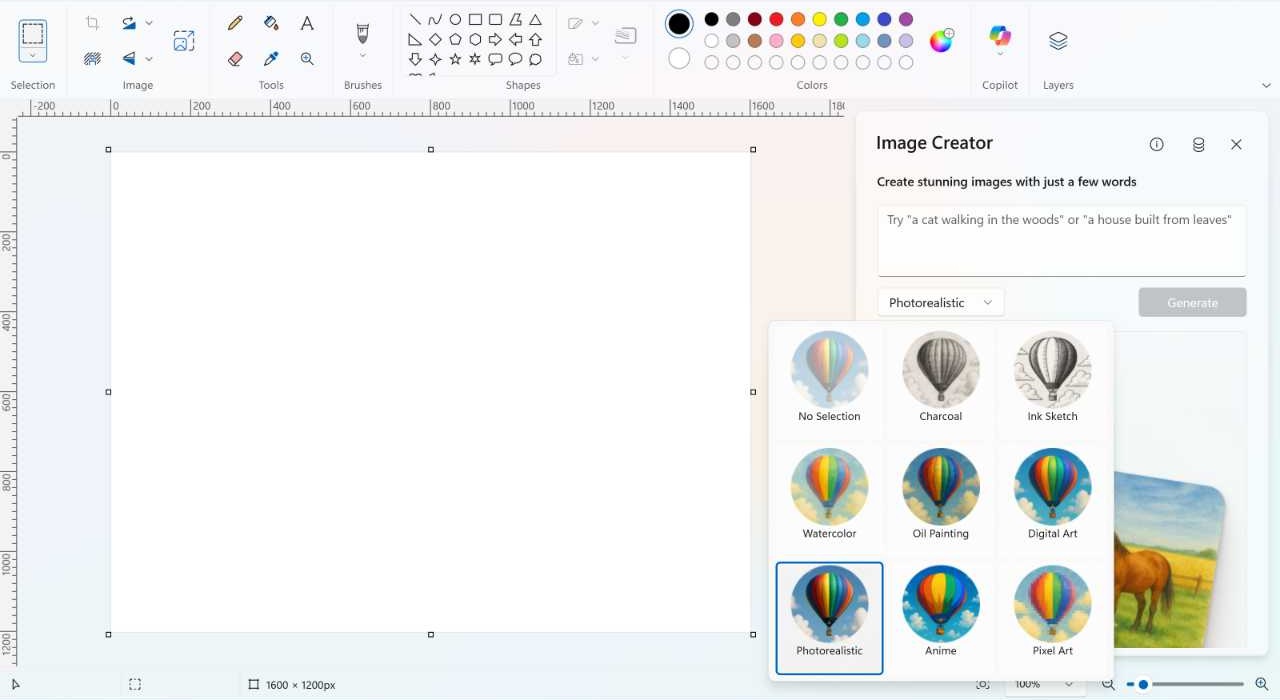
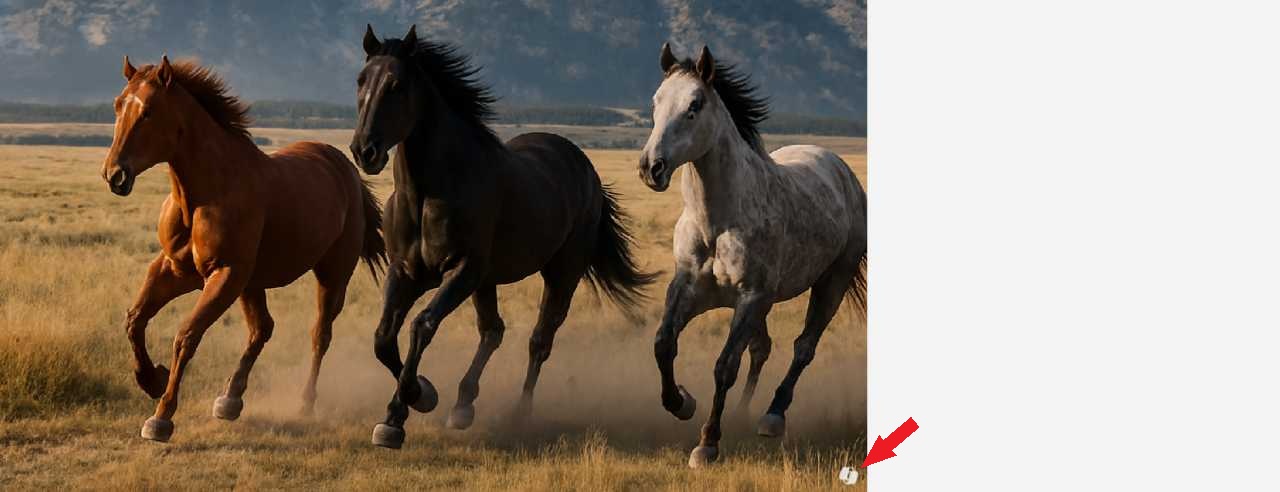
Image Creator can make high-quality images, as you can see from the horses image used elsewhere in this chapter. But there are some downsides compared to the competition. You have to have a Microsoft 365 subscription and spend AI credits. It only creates a single image and there’s no way to make changes in an ongoing conversation. And there’s no way to configure it to create images in anything apart from a square aspect ratio.
Generative erase
Generative erase is a cloud AI-based tool that can remove objects from an image, similar to Magic Eraser in Google Photos.
To get started, open an image in Paint and select Generative erase from the Copilot menu. When you do, two new interfaces appear: A Generative erase pop-up in the top center of the app with “Add area to erase,” “Reduce area to erase,” and “Apply” buttons, and a Generative erase slider on the left that lets you resize the round eraser cursor you will use to select one or more areas to erase.
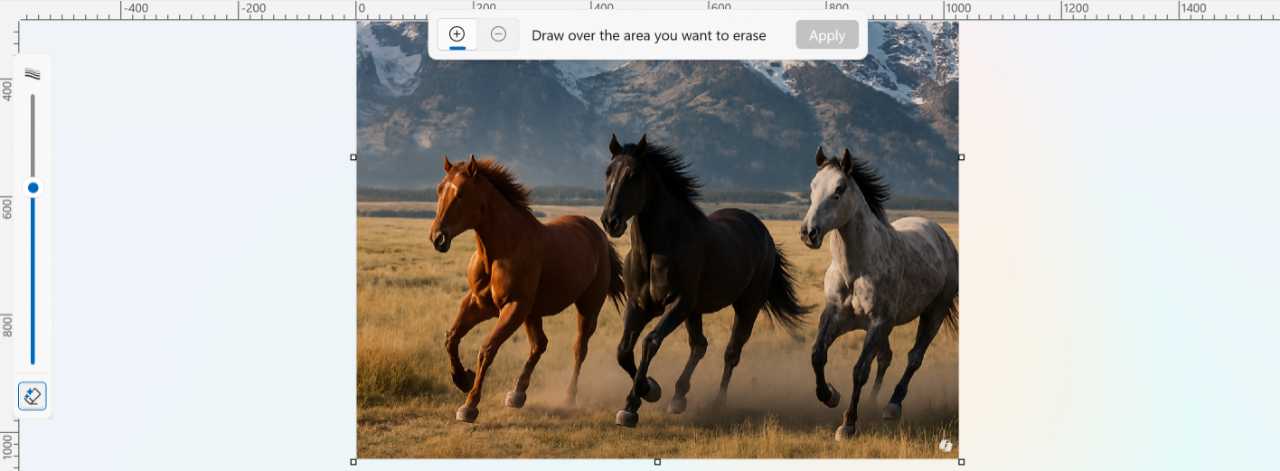
From here, you can:
- Change the size of the eraser cursor you’ll use to select (or reduce) the area in the image you wish to erase.
- Use the eraser cursor to select the area you wish to erase. Note that you don’t have to be particularly accurate.
- After you’ve selected an area to erase, you can fine tune it by clicking the “Reduce area to erase.” Then, you can optionally resize the eraser cursor and use it to remove parts of the selected area.
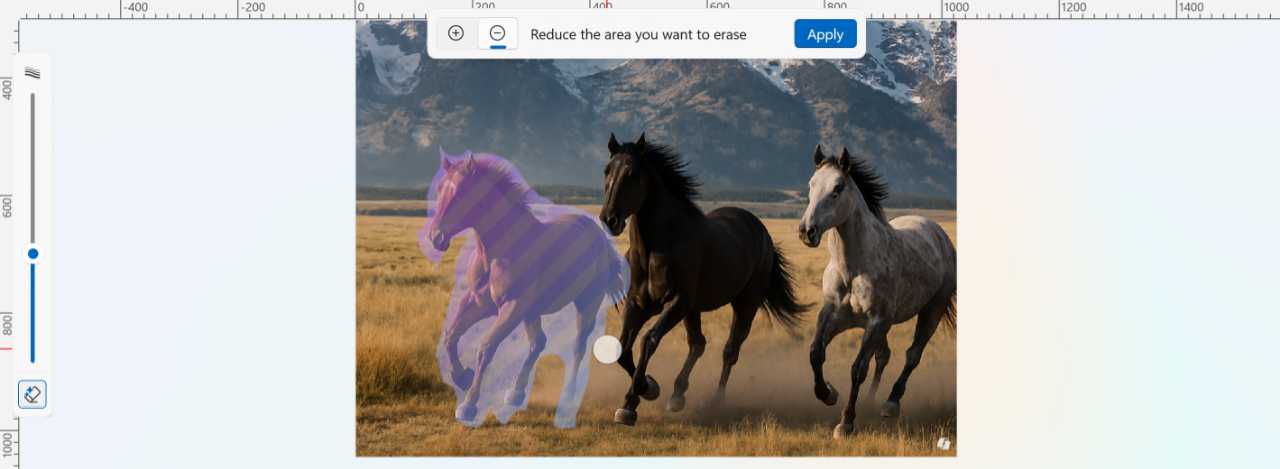
- When you’re ready to erase, click the “Apply” button in the top pop-up. After a purple-pink animation that’s typical of generative AI these days, the edit is made.
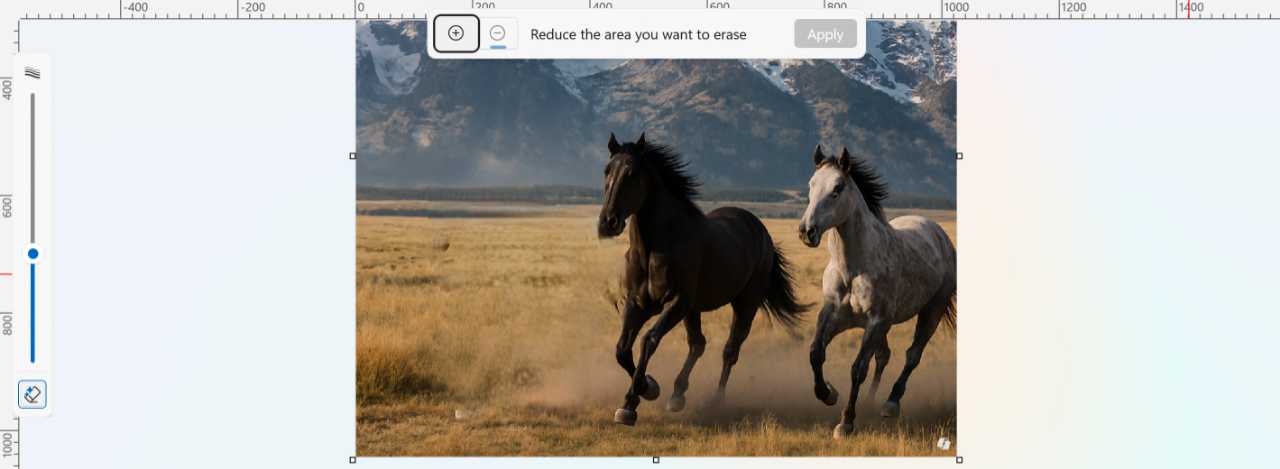
From here, you can erase other areas or use Undo (Ctrl + Z) to reverse the change.
? New Paint features that require a Copilot+ PC
Copilot+ PCs are AI PCs that include a modern AMD, Intel, or Qualcomm processor, at least 16 GB of RAM, 512 GB of SSD storage, and a Neural Processing Unit (NPU) that delivers at least 40 TOPS of hardware-accelerated local AI performance.
That latter requirement is most pertinent to the features in Paint that are only available to those with a Copilot+ PC: Each of these features runs locally using small language models (SLMs) installed on the PC. Because they don’t require or even use cloud-based AI, they can be used while the PC is offline, too. And unlike the most useful cloud AI-based features described previously, there are no limits, AI credits, or Microsoft 365 subscription to worry about.
✅ Tip: If the SLM required by Paint isn’t yet downloaded to the PC, you will be prompted to install it from the Microsoft Store when you attempt to access any of these features.
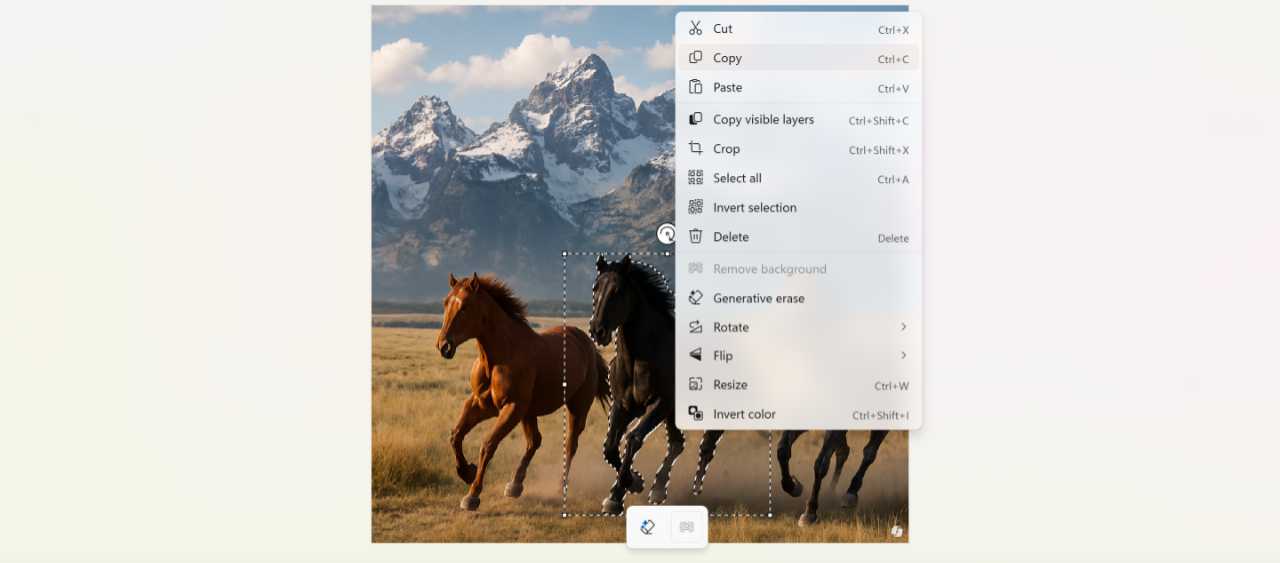
Object select
Object select works like similar features in Adobe Photoshop and other professional image editing solutions: You can mouse over objects in an image and Paint uses AI to select each in turn, so you can find the one you want and then copy, move, or erase it, or replace it using Generative fill.
✅ Tip: Generative fill requires a Qualcomm Snapdragon X-based Copilot+ PC.
To get started, open an image and select Object selection in the Copilot menu. Then, as you move the mouse cursor over the image, it will highlight individual objects it can select.

When you find the object you wish to select, click the mouse button. A selection rectangle will appear around the object with a pop-up below it; if the object is in the foreground, it will display a “Generative erase” button. If the object is in the background, the “Remove background” button will also be available.

From here, you can copy or cut the selected object to the Clipboard so you can paste it elsewhere, invert the selection, delete the object, and access other actions: Just right-click to see what’s available. You can also resize or rotate the selected object using the rotation tool and handles on the selection rectangle.
Sticker generator
This somewhat frivolous feature lets you prompt the AI to create a digital sticker as a way to add a personalized visual object. This one couldn’t be easier: Just open Sticker generator from the Copilot menu, describe the sticker design you want in the prompt, and click “Generate.” Paint will create four designs to choose from. To add a sticker you like, double-click it; you can then resize or rotate it, move it to a new location, or access Generative erase and Remove background tools from the associated pop-up.
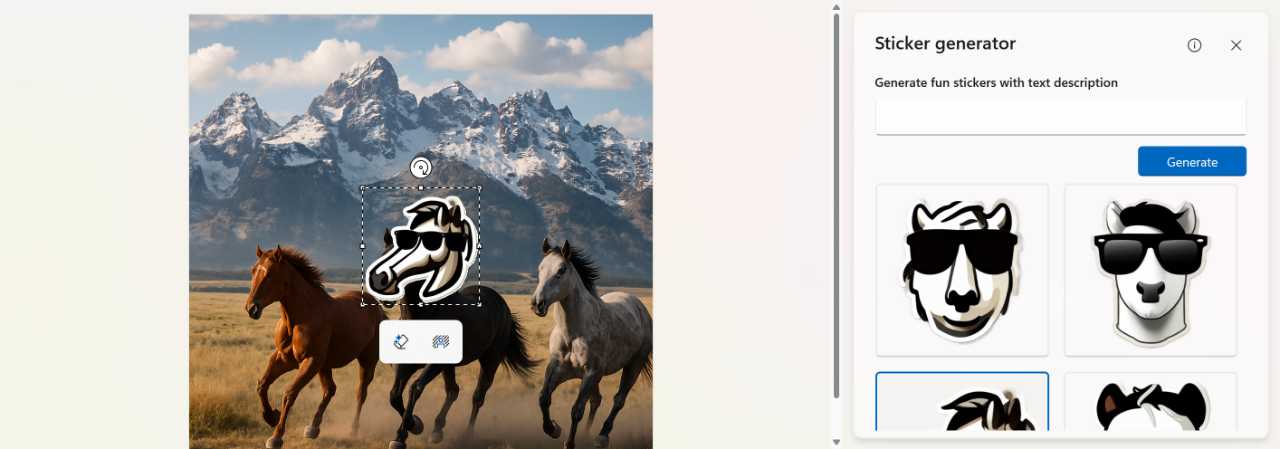
Each sticker in the Sticker generator pane also has an associated “More” (“…”) button that displays a menu of commands for copying and saving it separately.
Cocreator
Cocreator works a bit like Image Creator in that you can write a text prompt to instruct the AI to create an image. But it uses a local AI model instead of DALL-E. And it adds a twist, too: You can draw a design using the mouse or a smartpen, and the AI will use that drawing to generate a more professional looking version of it. This is useful whether you have any drawing skills or not.
To get started, open Cocreator from the Copilot menu. Then, write a prompt in the text box and begin drawing even a very rough sketch of the design you want on the image canvas. As you draw, an image will appear on the dotted grid in the Cocreator pane.
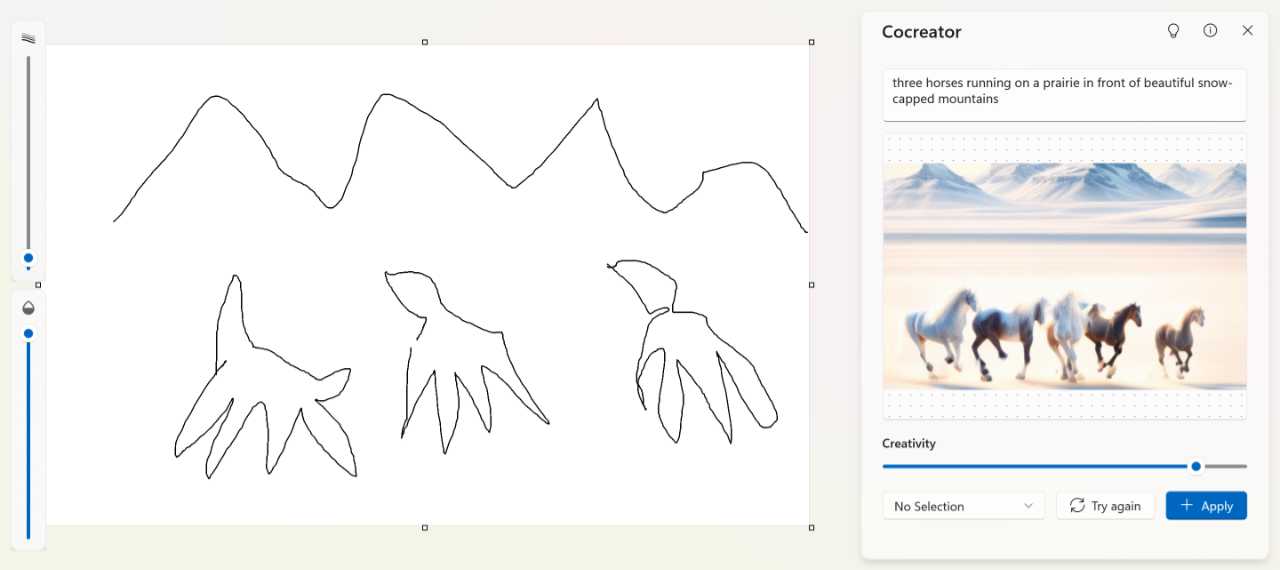
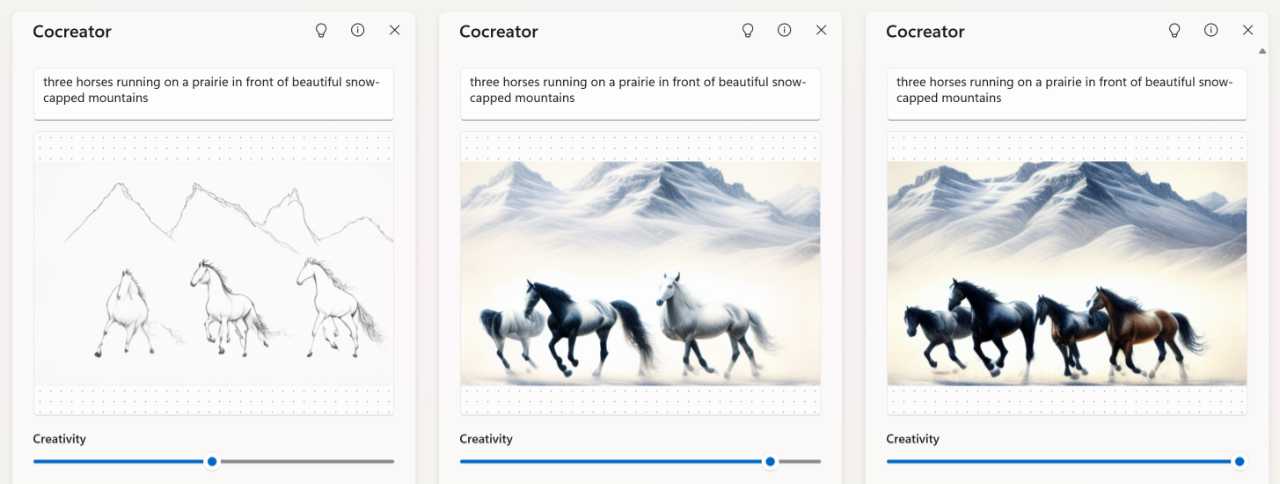
Note the Creativity slider: It defaults to 70 , in a range of 0 to 95, and the higher the value, the better the quality of the image it creates. At 0, the image will be identical to the drawing you make on the canvas.
You can also click the “No Selection” drop-down to choose a style. Here, those choices are Watercolor, Oil Painting, Ink Sketch, Anime, and Pixel Art.

To apply the generated image and replace your sketch, click “Apply.” If you want to regenerate a new image, click “Try again.”
Generative fill (Snapdragon X Copilot+ PCs only)
Generative fill lets you add and replace objects in an image by filling a selected area according to the instructions you provide in a text-based prompt. It works very much like the Generative erase feature described above, with the same basic user interface. But instead of just removing an object, you can add information to an image using AI.
To get started, open an image and select Generative fill from the Copilot menu. Two new interfaces appear: A Generative fill pop-up centered over the image with “Add area to fill,” “Reduce area to fill,” and “Next” buttons, and a Size slider on the far left so you can size the selection cursor you’ll use to define the area to change.
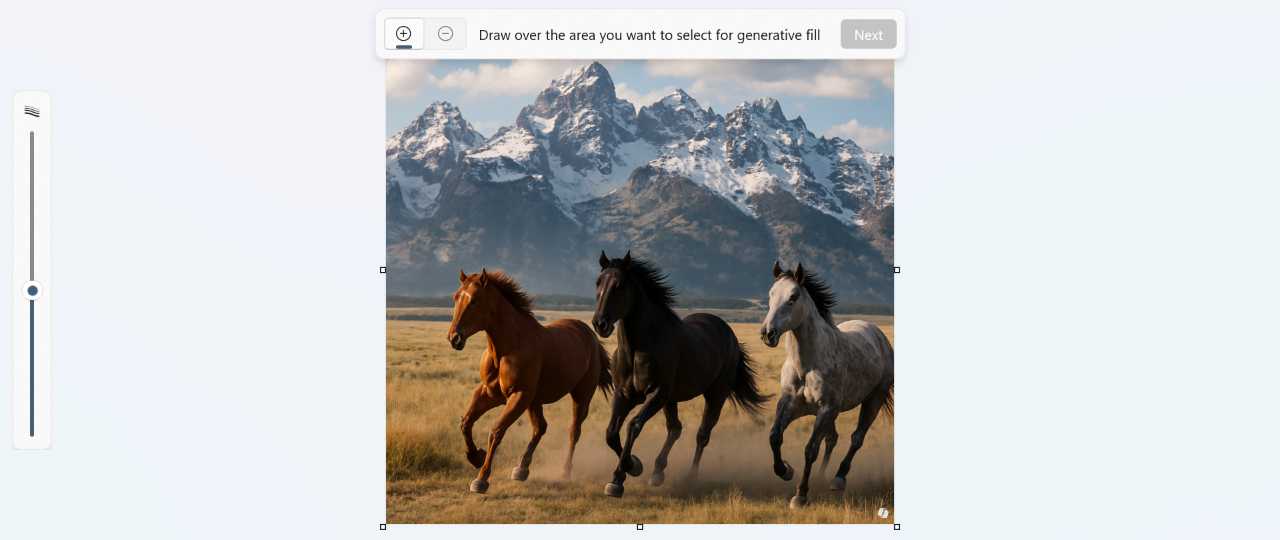
Change the size of the selection cursor as needed and then use it draw over the area you would like to change, using the “Add area to fill” “Reduce area to fill” buttons as needed to refine the selection.
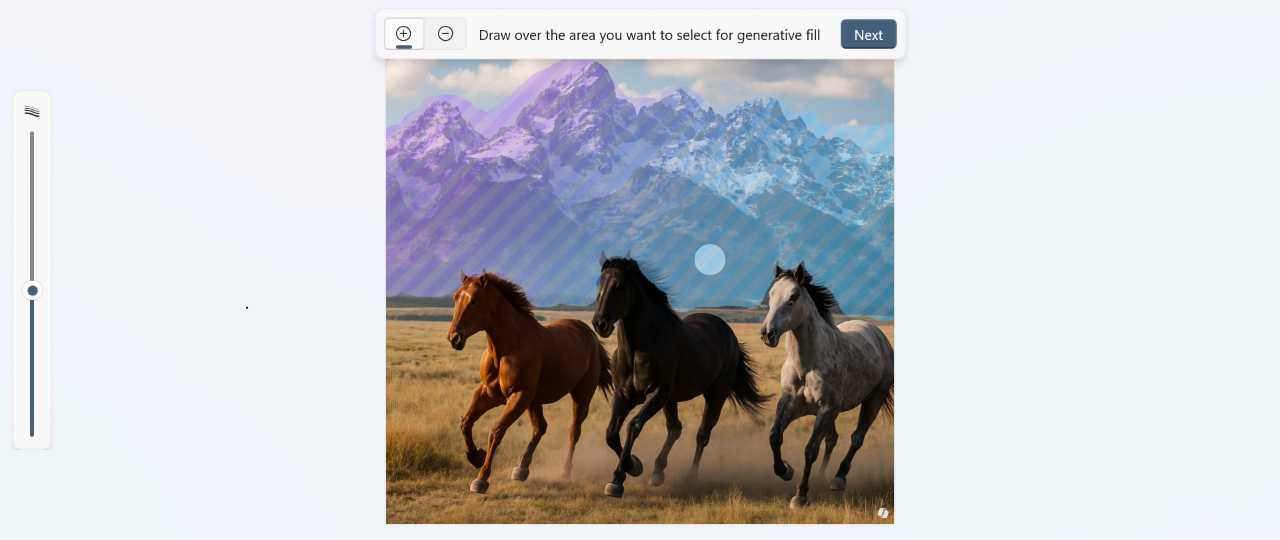
When you’re ready to add or replace an object, click “Next.” A prompt pop-up will display so you can describe the change you want to make.
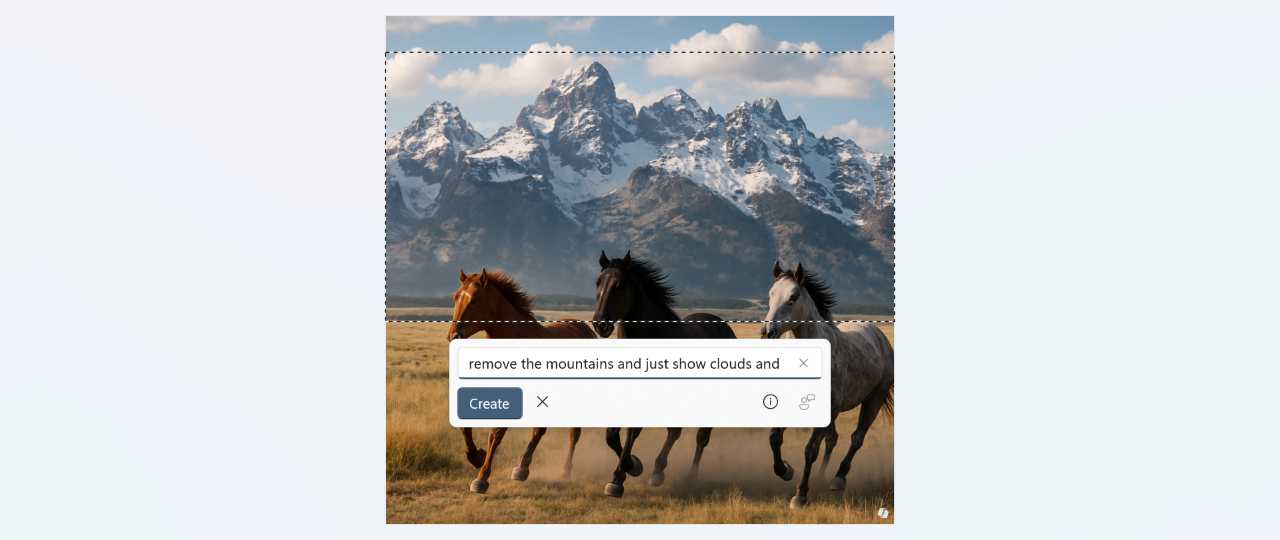
When you’re done, click “Create.” After a brief blue-purple-pink animation similar to other AI tasks appears, Paint will make the change you requested, or at least try.
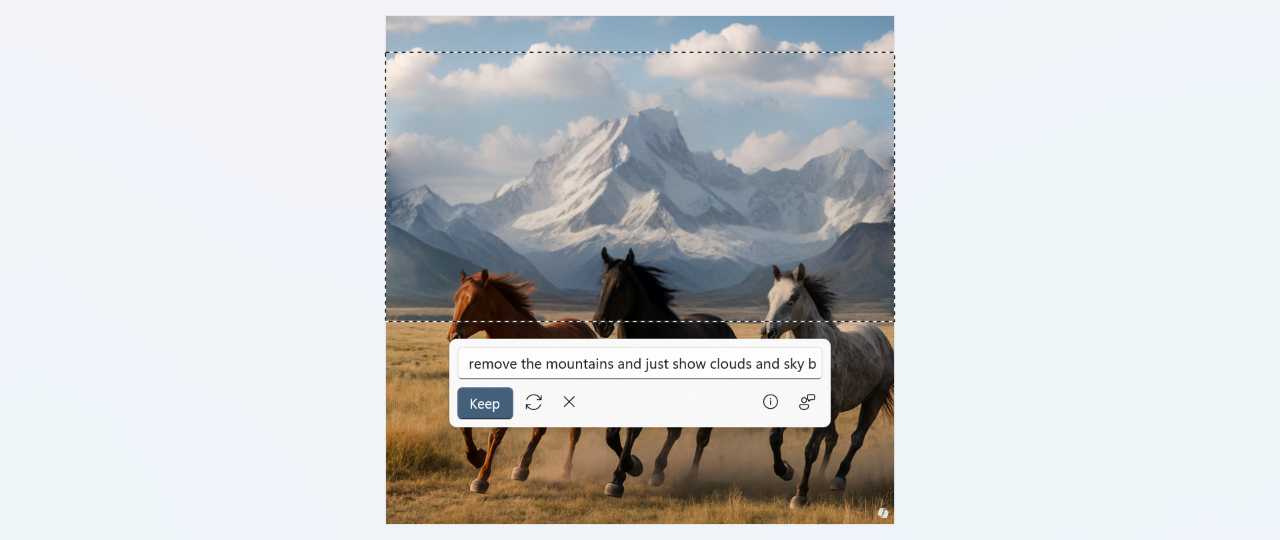
If this change is acceptable, click “Keep.” If not, you can click a “Try again” button and see whether the AI will get closer to what you want. Or, you can edit the prompt to be more specific.

Gain unlimited access to Premium articles.
With technology shaping our everyday lives, how could we not dig deeper?
Thurrott Premium delivers an honest and thorough perspective about the technologies we use and rely on everyday. Discover deeper content as a Premium member.